Importing Assets and More
There is a Web GUI importer available in the Import section that will allow you to upload and process and import a comma-delimited CSV through the web interface. The importer may choke on larger imports, so if you have more than several hundred records to import, you may wish to use the command-line tool.
Splitting Large Import Files
Linux/Mac users with parallel
or coreutils
installed can run the following to break their large CSVs into smaller CSVs for easier processing:
cat bigFile.csv | parallel --header : --pipe -N9999 'cat >file_{#}.csv'
This will split your CSV into smaller CSVs with the header intact. In the above example, we use 49999 as the split (so, 50k once you include the header.) You can increase or decrease this number depending on the memory your Snipe-IT server has allocated.
Make sure you have your organization's domain name, email format and username format set in Admin > Settings, so that it knows what domain to use when generating email addresses and usernames if none are provided in your CSV.
Hosted customers can send their CSVs to [email protected] if you're having trouble with the Web GUI and we'll take care of it for you. Please note that self-hosted customers should go through normal free support channels.
IMPORTANT
BACK UP YOUR DATABASE FIRST. Always run a backup (Admin > Backups) before running the importer, so that you have a clean place to roll back to if something goes wrong.
Usage
php artisan snipeit:import path/to/your/file.csv
Optional Arguments
Option | Values | Notes | Required |
---|---|---|---|
--item-type | Asset , Accessory , Consumable | Defaults to Asset | No |
--logfile | Any valid path | Defaults to snipe-it-directory/storage/logs/importer.log | No |
--verbose | None | Prints all information going to the log to screen as it processes. | No |
--user_id | Integer representing user ID | The user id to import assets as. Defaults to 1. | No |
--update | None | If flag is passed, the importer will attempt to update items instead of ignoring duplicates | No. |
CSV Format
The importer reads the first row of the CSV file to determine what each column is.
IMPORTANT
The value in the header cell MUST MATCH one of the following options, or one of your existing Custom Field names. Please make sure there are no leading or trailing spaces in the header column names, and no blank lines at the end of your CSV. Header field names are not case-sensitive.
The CSV importer can currently only support automatically checking assets out to people, not to locations, other assets, etc. You should use the bulk checkout functionality for importing assets that are checked out to non-people.
Sample CSV Downloads
- Sample asset import CSV
- Sample accessories import CSV
- Sample consumables import CSV
- Sample users import CSV
- Sample licenses import CSVx
- Sample components import CSV
Common Fields
Field | Example Data | Required | Notes |
---|---|---|---|
Item Name | Karen 2015 | No | |
Company | MacandDonalds | No | Created if it doesn't exist. Leave this blank if you don't need to support multiple companies. |
Category | Laptop | Yes | Created if it doesn't exist |
Location | San Diego | No | Created if it doesn't exist |
Purchase Date | 2015-01-12 | No | Can take any date format that can be translated by strtotime() |
Purchase Cost | 2999.99 (without commas or currency symbols) | No | Cost of asset |
Asset-Only Fields
Field | Example Data | Required | Notes |
---|---|---|---|
Full Name | Firstname Lastname | No | No commas. First name first, last name last |
[email protected] | No | If empty, will be generated using the email_format and domain you provide in Admin > Settings | |
Username | yourname.lastname | No | If empty, will be generated using the username_format you provide in Admin > Settings |
Model Name | MBP Retina 13-inch | Yes | Created if it doesn't exist |
Manufacturer | Apple | No | Created if a value is provided but it doesn't yet exist |
Model Number | MacbookPro12,1 | No | |
Serial | C20095805496869045H6 | No | |
Asset Tag | KJH90890 | Yes | |
Notes | Karens old machine | No | |
Image | Filename.jpg | No | If Present, this is the basename of the image assocaited with the item. Images must be manually uploaded to public/uploads/assets. |
Status | Ready to Deploy | No | A status label applied to the item. Created if it doesn't exist. If you leave this blank and provide a username, it will automatically be checked out to that user. If you leave this blank without a user, it will automatically be set to Ready to Deploy. |
Warranty months | 15 | No | Time in months until warranty expires |
Checkout Type | user | No | Should we checkout to a user or to a location? Defaults to user, and user is implied if the field does not exist. |
Checkout Location | Planet Mars | No | Name of Location to be checked out to if checkout_type is location. This Location will be created if it does not exist. |
Order Number | PO-007 | No | The Purchase Order # for the asset. Will be shown next to Purchase Cost. This Purchase Order will be created if it does not exist. |
Supplier | Mike's Tech Shop | No | Supplier name |
Asset tag is no longer required if you have auto-incrementing enabled, however if you'd like to generate incrementing asset tags via Excel for some reason, you can do so easily using this helpful guide.
NOTE
If you enter a status, the system will generate the status label for you, but you will have to go in and edit the status to make sure it has the appropriate attributes. For example, if an asset is "Archived Forever", you'll need to go into Admin > Status Labels and edit the attributes of the "Archived Forever" status label to reflect that it is in an archived state.
Accessory-ONLY/Consumable-ONLY Fields
Field | Example Data | Required | Notes |
---|---|---|---|
Quantity | 15 | No | Amount of item in stock. Defaults to 1. |
Importing Custom Fields
To import values for your custom fields, you MUST create the custom fields in Snipe-IT first. Once all of the custom fields you want to import to are created in Admin > Custom Fields, you can simply add additional columns to your CSV. Make sure the name of the Custom Field exactly matches your existing Custom Fields. Fields that cannot be matched will be skipped.
You'll still need to create Custom Fieldsets, assign your new Custom Fields to those field sets, and assign them to your newly imported models once you're done with your import. We don't currently try to create your fields on the fly, or try to assign them to Custom Fieldsets and Asset Models because bad data could make a real mess of things if we did. Future versions will have a nicer Web UI interface that will allow you to handle some of those tasks on the import.
Custom Fields are stored as plain text
Custom fields formatted as 'dates' should be in the format: YYYY-MM-DD.
Custom fields formatted as 'Checkbox' should be written as
value1, value2, value3
- with a comma, and a space in between each value.
What It Does
When you execute this command with a valid path to your CSV, the importer will:
- Split the user's name, creating
firstname
andlastname
. - If not user is provided, it assumes the asset is Ready to Deploy.
- If a user's name is provided, it assumes that asset is assigned to them
- If a user's name is provided but no email is provided, it will generate an email address using your domain and the pattern you specified in
email_format
- Generate a password for the new user if a user's name is provided
- Create the user if they don't exist (based on their email address)
- Determine if the asset model exists based on Asset Model Name and Model Number combination
- Create the asset models, locations, category, etc if they don't currently exist, skip them if they do.
- If no user is provided, the asset gets created as ready to deploy instead of checked out to a user
Limitations & Notes
The importer isn't very smart. It currently does not do any validation other than checking to see if the record already exists in the database. It doesn't know that Dell Inspiron
is the same asset as Dell Insprion
. The quality of your data will make a big difference in the results you get, so if there's a lot of inconsistency, you're going to end up with with duplicates because the app has no way of knowing what you meant from what you wrote.
Exporting Comma-Delimited CSVs on Windows
This is most common for Windows users in non-US regions, but if your Excel export is generating CSVs that are separated by something other than commas (semicolons, tabs, etc), you'll have to make a configuration change on your Windows system to get it to export correctly.
- Edit your Regional Settings or Windows (Regions and Language).
- On the Formats tab hit Additional Settings....
- Change the List Separator to the character you want to use as your CSV separator.
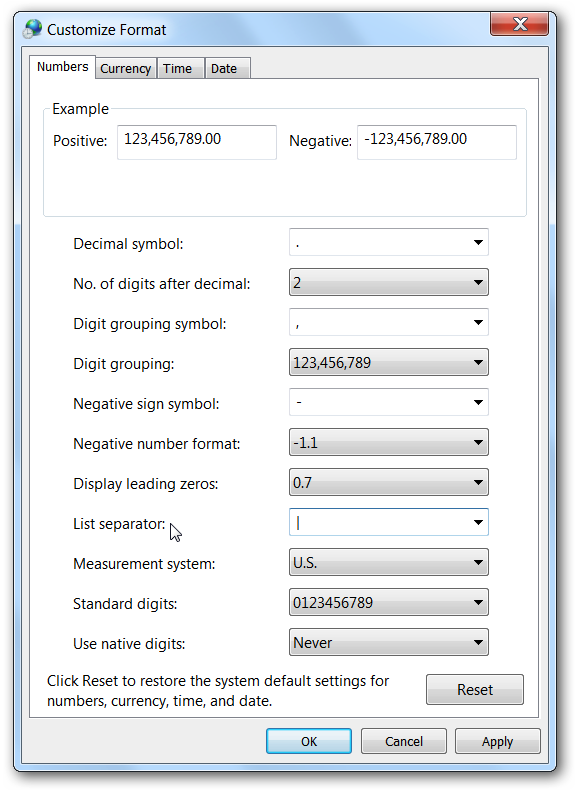
Apply those changes, and now you can go back to Excel and save the file as a CSV. It should be saved using your chosen separator.
Updated 3 months ago