
SAML
Configuration guidelines for SAML Single-Sign On (SSO) support
TLS Security WarningIf your Snipe-IT instance is not secured by TLS (formerly SSL) and you are using these settings to secure your installation, we HIGHLY recommend you stop here and instead first setup TLS for your instance. Almost always, unless you know what you are doing, an administrator's time would be better spent securing their Snipe-IT installation with TLS before using SAML.
Just-in-Time (JIT) ProvisioningSAML can only authenticate a user in Snipe-IT if the user exists in Snipe-IT. We do not attempt to create a user on SAML login. This means that if a user exists in your SAML directory but NOT in Snipe-IT, that user will not be able to login to Snipe-IT with SAML. We typically recommend using the LDAP sync or SCIM to pull your users in, then SAML to authenticate them.
For most cases, JIT provisioning kinda doesn't make sense in this scenario, since a newly created, unprivileged user wouldn't only be able to see the assets assigned to them, and if they didn't exist before, they wouldn't have anything assigned to them anyway.
Snipe-IT includes the ability to integrate SAML (Security Assertion Markup Language) for login, which will allow you to login using third-party services such as Azure AD, Google Workspace, Okta, OneLogin, Jumpcloud , and many other standards based SAML Identity Providers (IdP).

General Steps
- Configure SAML values at IdP (Entity-ID, Assertion Consumer Service (ACS) URL, Single Logout Service (SLS) URL)
- Download IdP Metadata or Get IdP Metadata URL
- Upload IdP Metadatafile or Paste IdP Metadata URL to Snipe-IT SAML settings
- (Optional) Add additional custom config to Snipe-IT SAML settings. If you're having trouble getting SAML to work, try adding
baseurl=https://assets.example.com/saml/(with your SAML url) here.
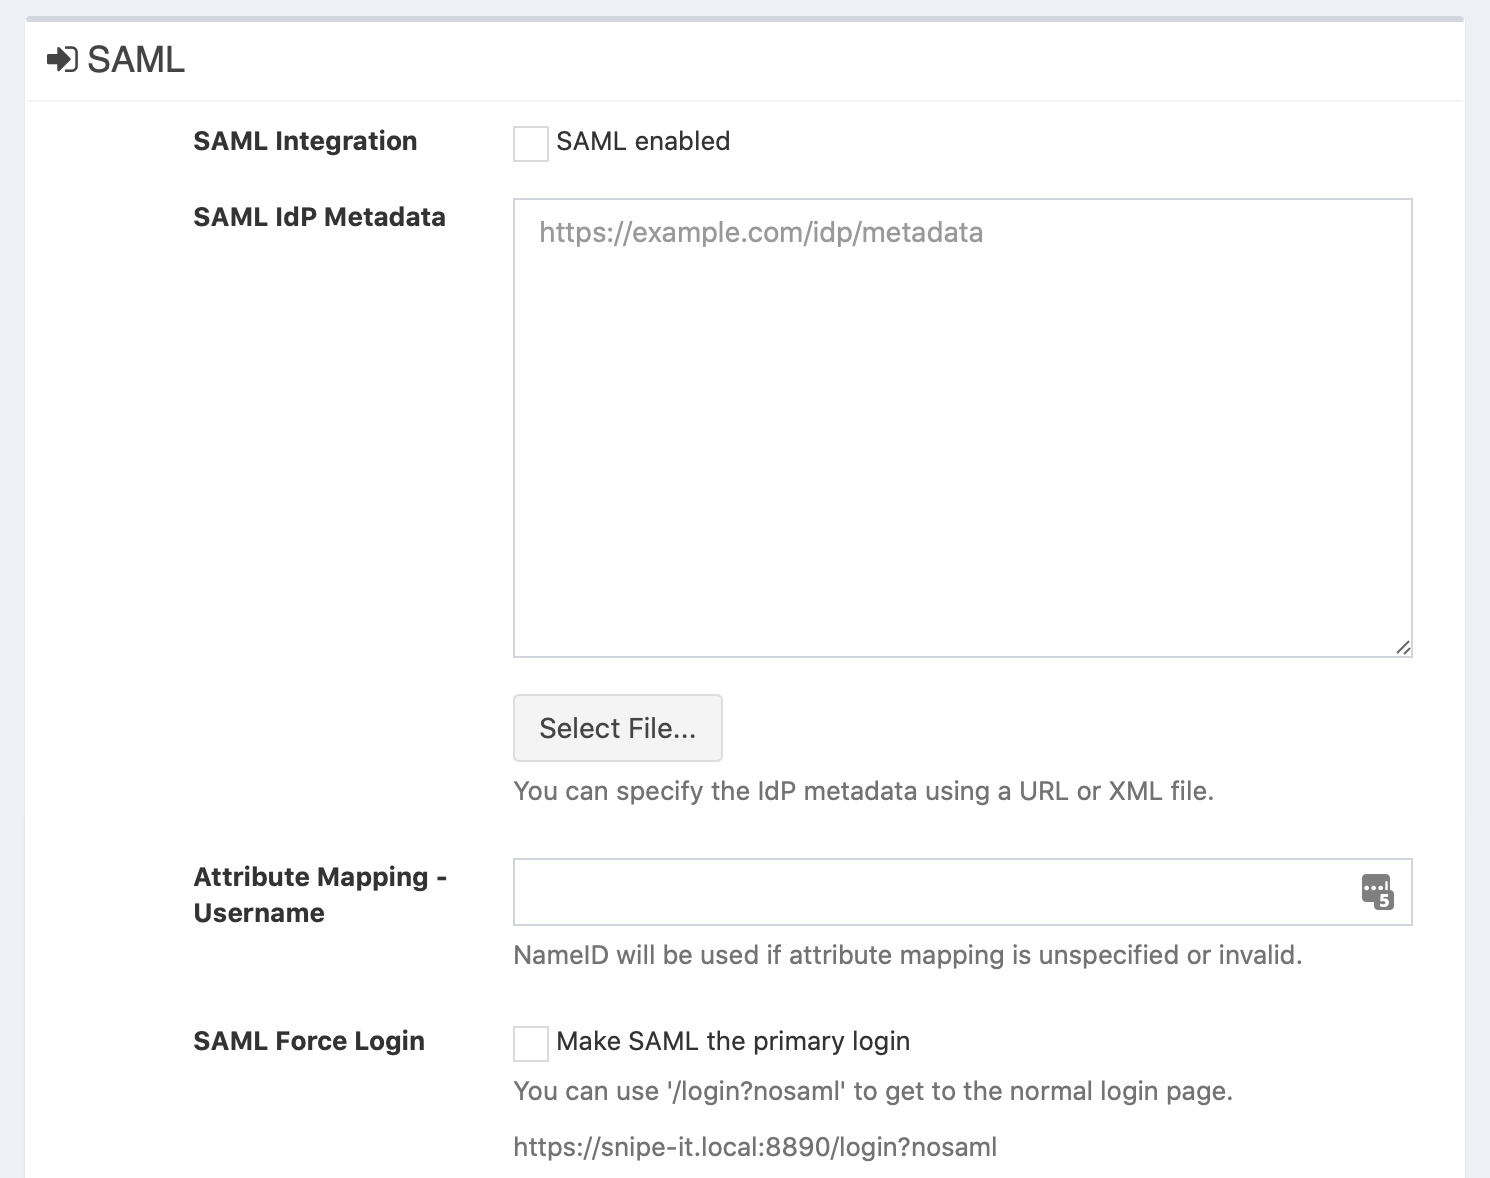
Snipe-IT SAML settings
Attribute Mapping - Username
It is possible to override the default setting which is to use the value from the NameID response element to match against the username of existing users. If your IdP uses another element in the SAML response, set that value here.
Relevant example from SAML response:
<Subject>
    <NameID Format="urn:oasis:names:tc:SAML:1.1:nameid-format:emailAddress">[email protected]</NameID>
    <SubjectConfirmation Method="urn:oasis:names:tc:SAML:2.0:cm:bearer">
        <SubjectConfirmationData InResponseTo="ONELOGIN_..." NotOnOrAfter="2020-10-01T00:00:00.000Z" Recipient="https://assets.example.com/saml/acs"/>
    </SubjectConfirmation>
</Subject>
If you have existing users configured in Snipe-IT, make sure that their usernames match the value of the NameID element!
SAML Force Login
When this checkbox is enabled, you will not see a login form of Snipe-IT anymore when you go to the Snipe-IT website. Instead it will redirect you directly to the IdP SAML Login.
When you need to see the login form of Snipe-IT to login with an existing user without SAML login, you could add the following query parameter to your Snipe-IT URL: /login?nosaml:
https://assets.example.com/login?nosaml
This might be useful when there are some technical problems with your IdP to be able to sill login to Snipe-IT. For this scenario, make sure that there is an "admin" user in the Snipe-IT user database, who does not login via SAML.
SAML Single Log Out
When this checkbox is enabled, then Snipe-IT will send a logout request to your IdP when you click on the Logout button in Snipe-IT.
This will cause the user to be first redirected to the IdP on logout. Leave unchecked if the IdP doesn't correctly support SP-initiated SAML SLO.
SAML Custom Settings
Here you can add custom settings to adjust the configuration of the underlaying library which provides the SAML functionality.
Values are defined as key-value pairs like the following: key=value
Config values are (some may be missing) (Source)
| Config Values | |
|---|---|
| `strict=true\ | false` |
baseurl=... | |
| `debug=true\ | false` |
sp.anySpConfig=... | |
idp.anyIdpConfig=... | |
security.anySecurityConfig=... |
When you run Snipe-IT behind a reverse proxy the following property might be necessary: baseurl=https://assets.example.com/saml
Advanced SAML Settings (Security and Encryption)
A few options in the "SAML Custom Settings" can be useful if you're implementing a high-security setup. When implemented, Snipe-IT will use the same certificates for all signing and encryption. Changing any of these settings will change the contents of the Snipe-IT Metadata XML, so if your IdP is not directly referencing the Metadata URL, you will need to re-download the Metadata and re-present it to your IdP after changing these settings.
security.authnRequestsSigned=true - This will activate signed authorization requests.
security.wantAssertionsEncrypted=true - This means that Snipe-IT will require that any assertions coming from your Identity Provider (IdP) must be encrypted.
security.wantAssertionsSigned=true - This will make Snipe-IT require that any assertions sent by your Identity Provider must be digitally signed.
security.wantNameIdEncrypted=true - This will make Snipe-IT require that the NameId that is sent from the IdP must be encrypted.
security.logoutResponseSigned=false - This will remove the requirement that Single Logout Service (SLO/SLS) requests be signed. Try setting this if a logout from your Snipe-IT instance results in an error in your laravel.log file like:
There was an error with SAML SLS: invalid_logout_response
Reason: Signature validation failed. Logout Response rejected
security.wantNameId=false - if you're using some other attribute other than NameID to transfer usernames, and your identity provider isn't even sending NameID's at all, this setting may help.
Debug SAML Settings
When you need to check the SAML response which is received by Snipe-IT, a simple workaround might be to use the developer tools of your browser.
After configuring your SAML config in Snipe-IT, just go to an incognito tab, open the devloper tools (mostly with F12) and go to the "network" tab.
Now open your Snipe-IT website and wait that the login of your IdP is shown. Login in with your IdP credentials and wait until you are redirected back to your Snipe-IT instance.
Now check the entries of your developer tools "network" tab. There should be an entry for "acs" or "saml/acs", which represents the redirect from your IdP to your callback URL which includes the SAML Response as body parameter. Click on the entry and scroll down in the entry's details to the request body and copy the value of the parameter SAMLResponse.
The value is base64 encoded, so find a tool which could decode it (I would not suggest to do this online, because the value contains a valid access token for your user at your IdP!). When you have decoded it you have the SAML response in XML format :)
Hint: Works in Google Chrome, and other browsers may work the same way.
SAML-tracer Chrome Plug-In
You may also want to try this Chrome plug-in, which can help you debug SAML's various assertions and responses - https://chromewebstore.google.com/detail/saml-tracer/mpdajninpobndbfcldcmbpnnbhibjmch?hl=en
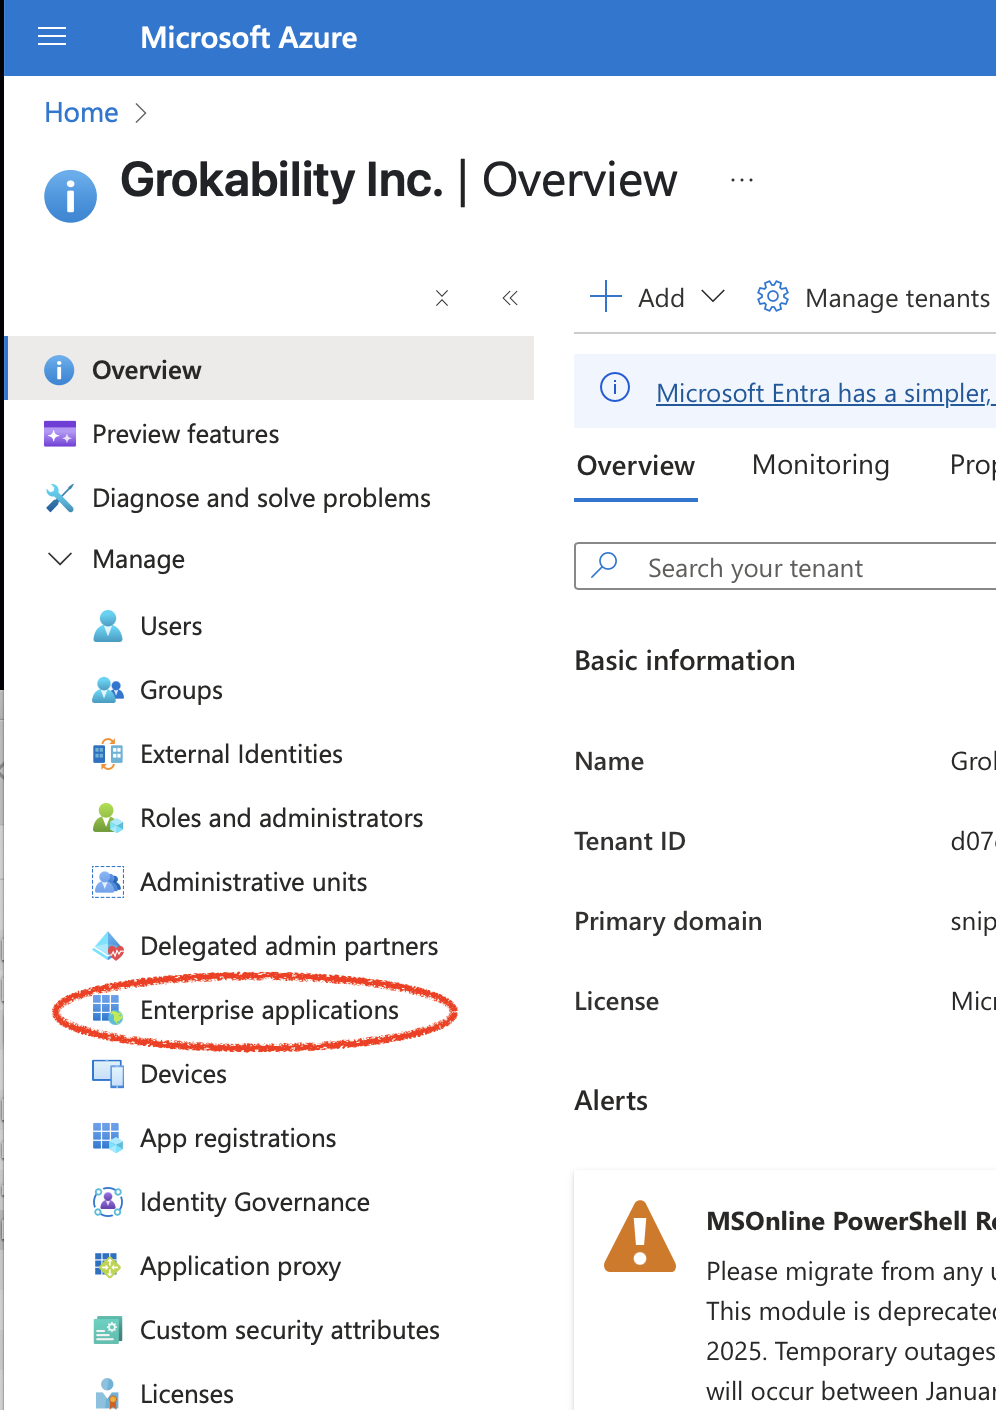
Entra ID (Formerly Azure AD) as SAML Identity Provider
Go to Entra ID, and click "Enterprise Applications":
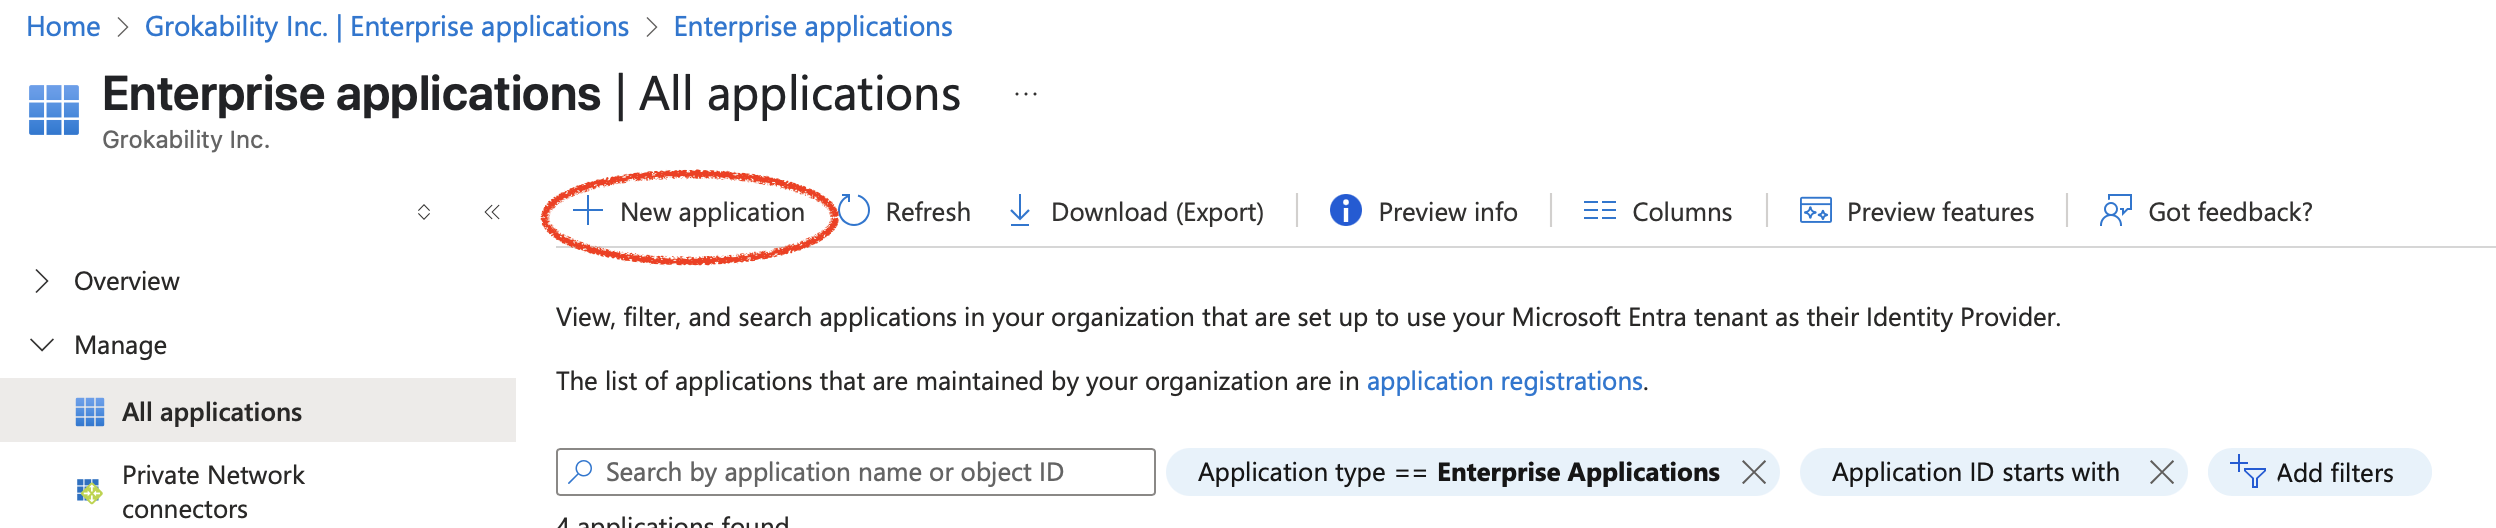
Pick New application:
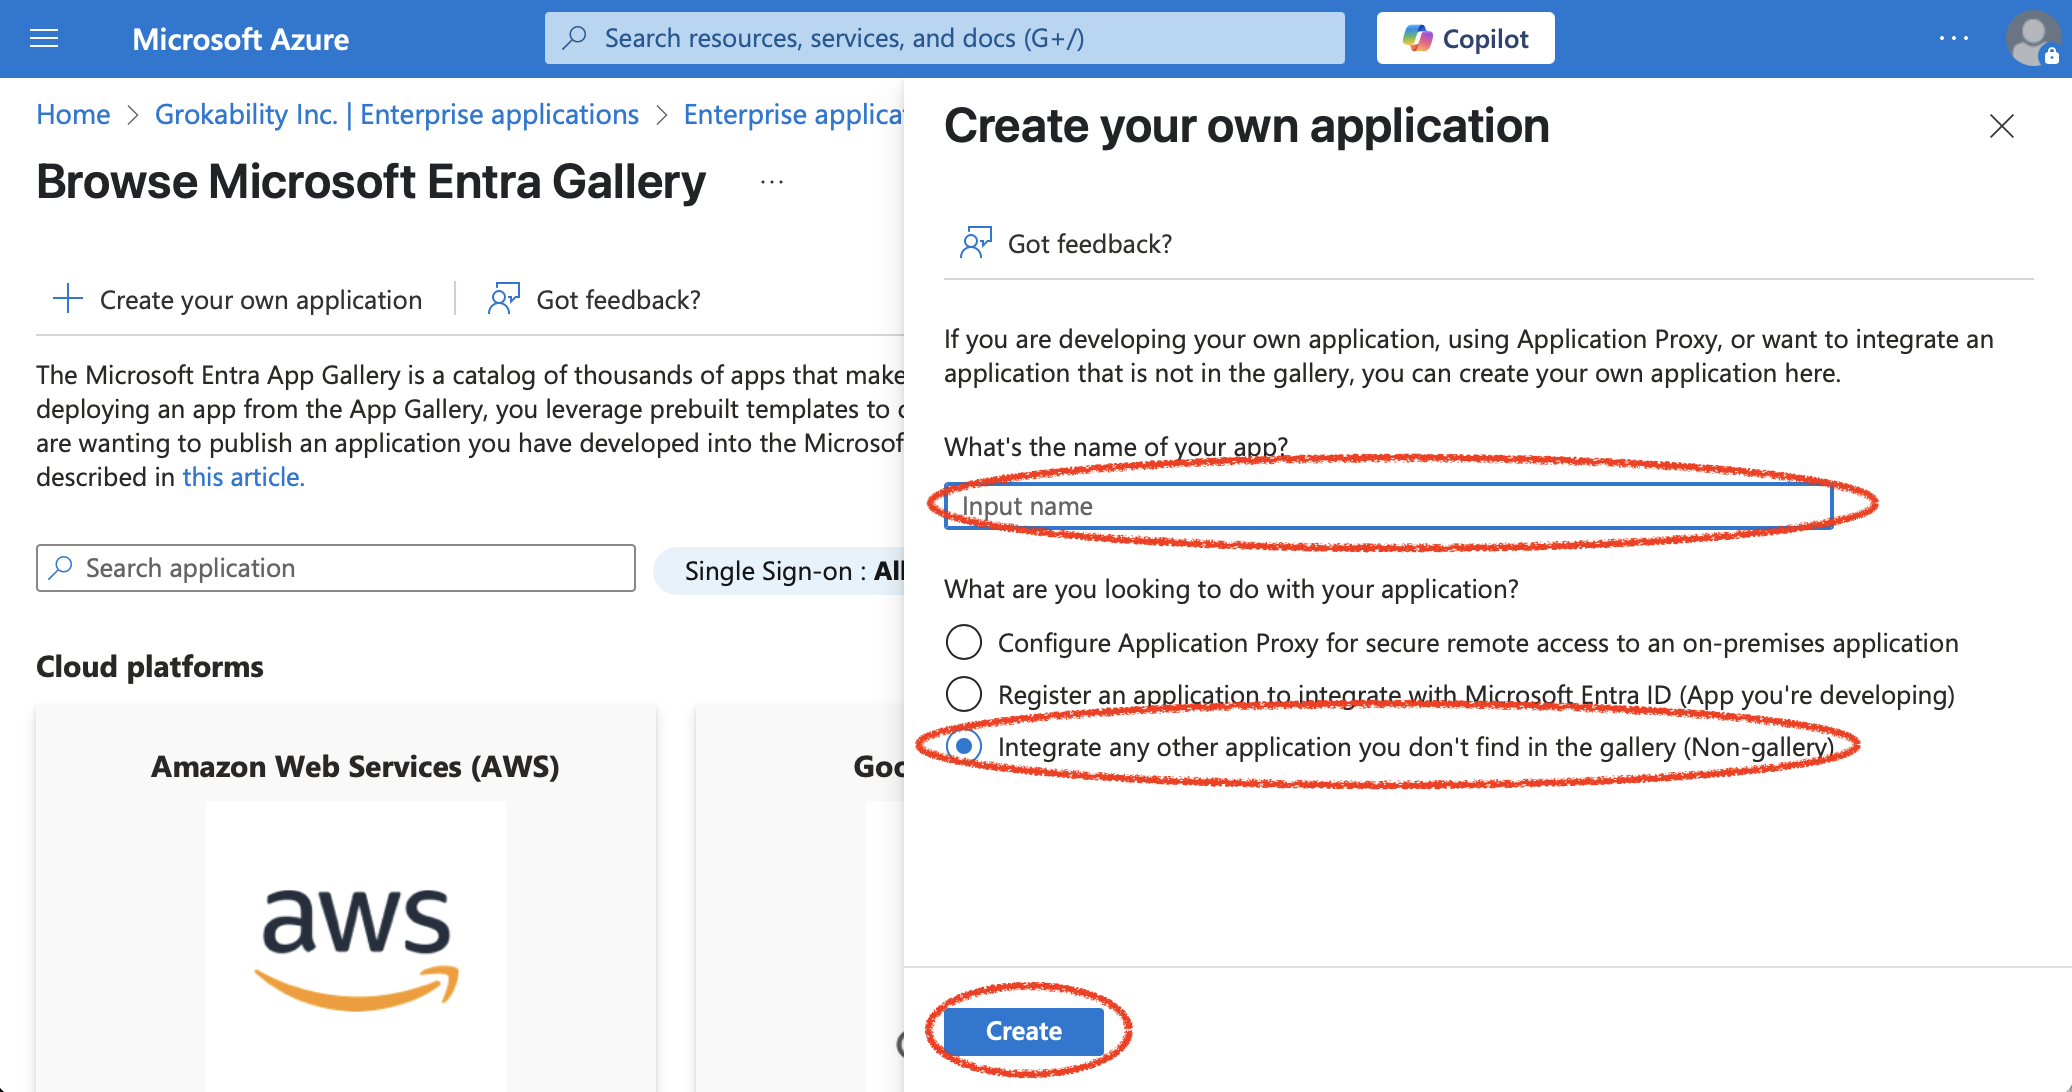
Then pick, Create your own application:
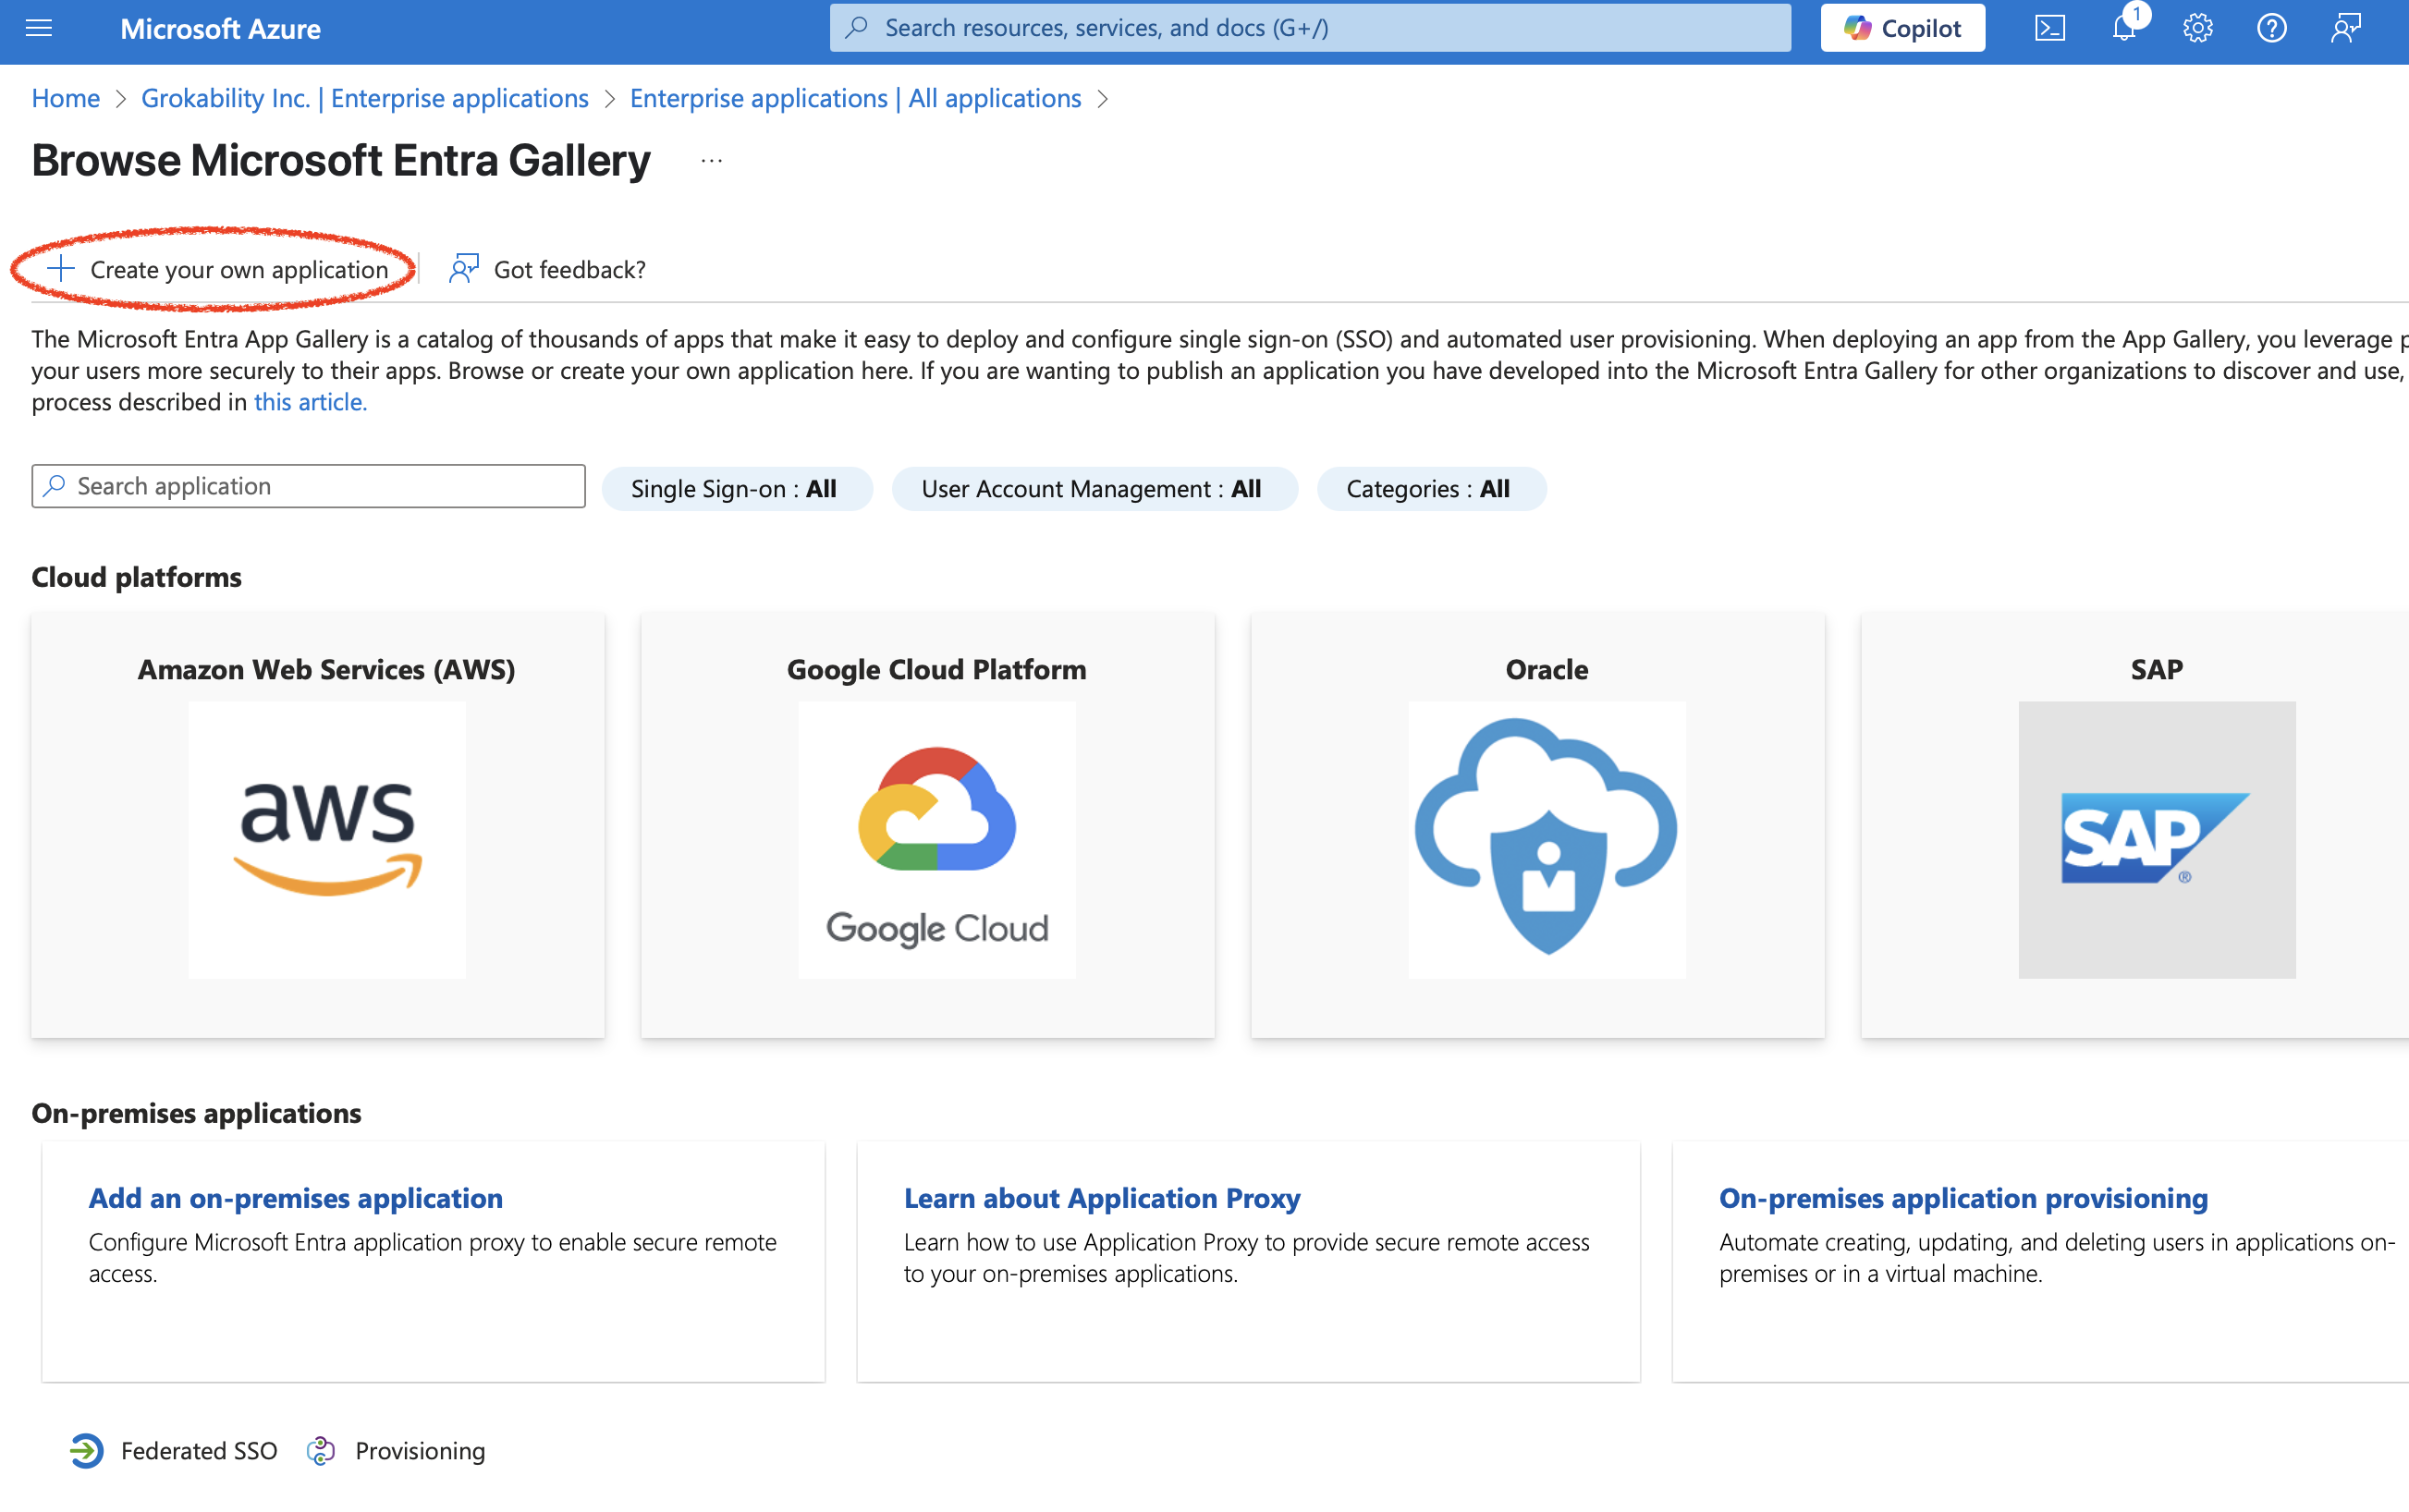
Pick an application name ("Snipe-IT" is usually a good choice), leaving the "Integrate any other application you don't find in the gallery (Non-gallery)" selected, and click "Create":
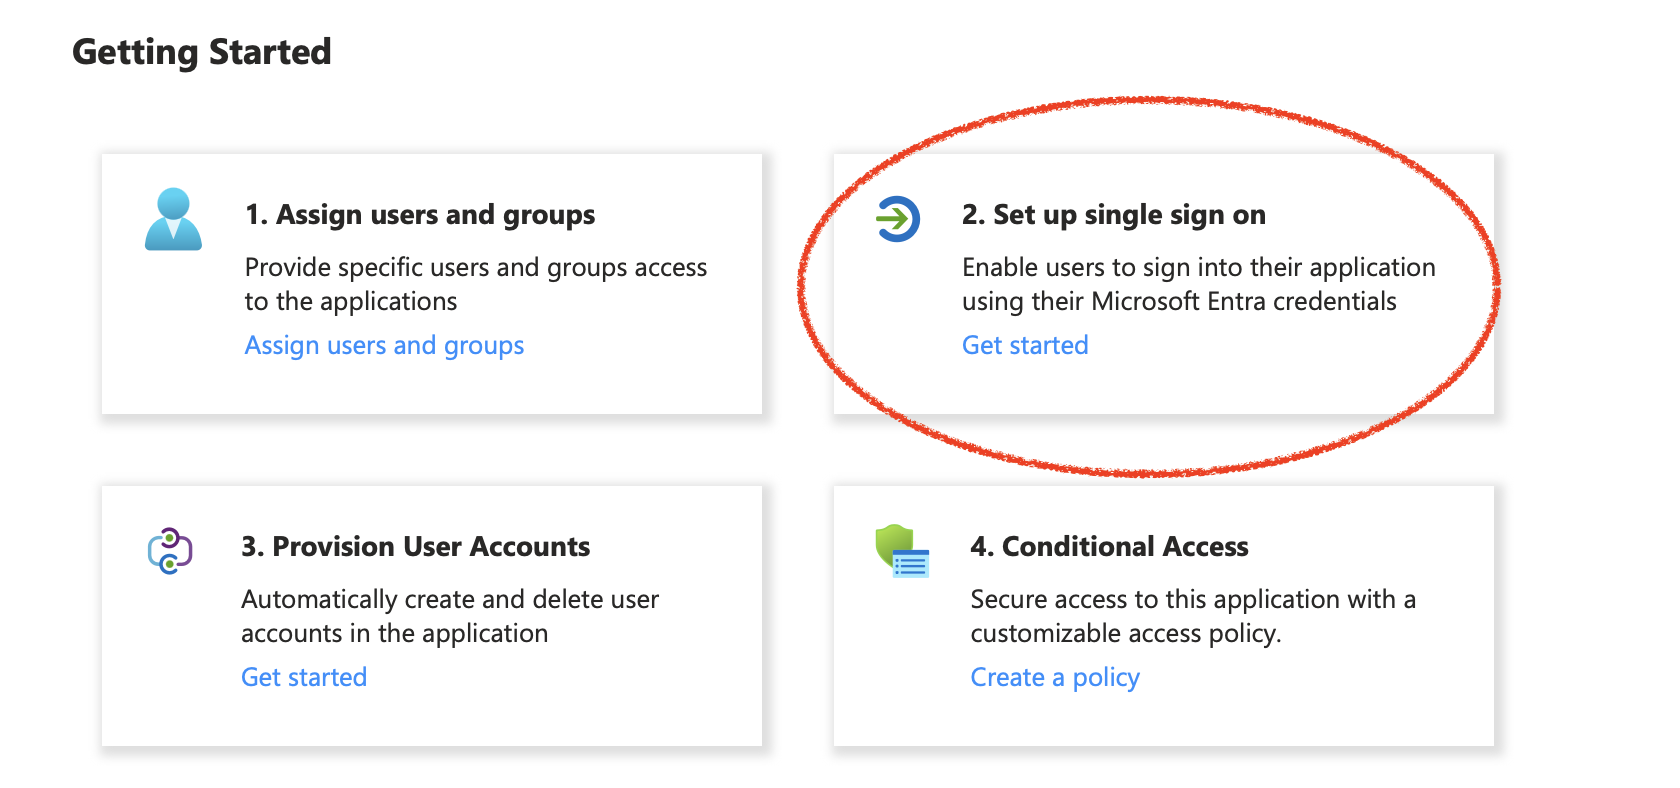
Then pick "Set up single sign on":
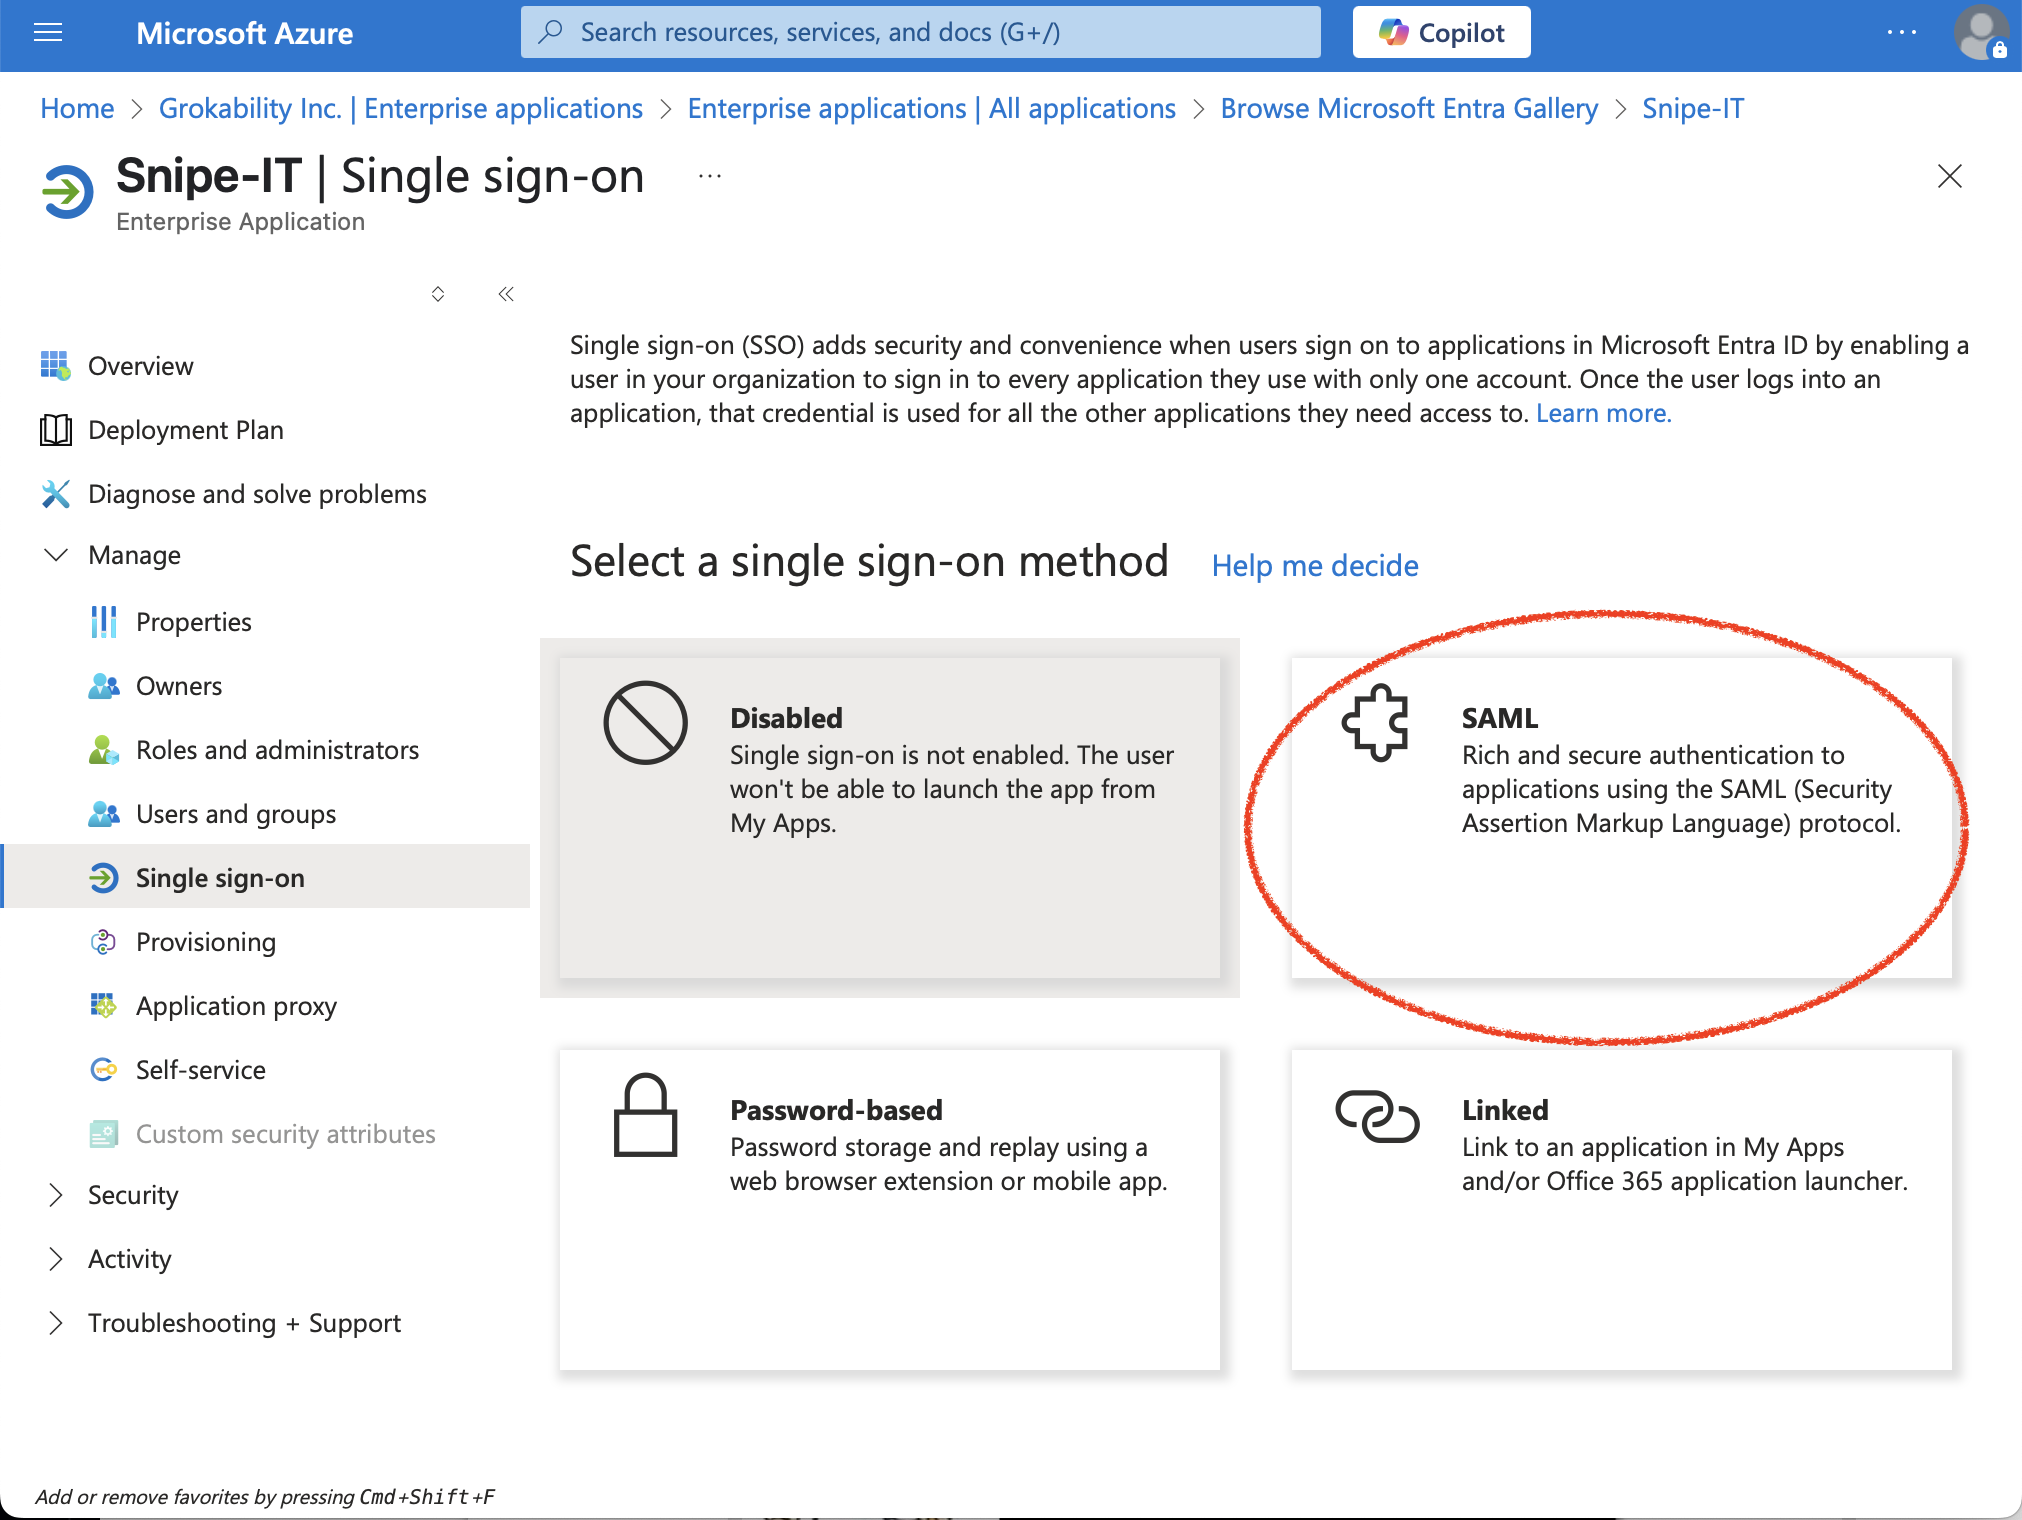
Then pick SAML:
Then click "edit" in the "Basic SAML Configuration" section:
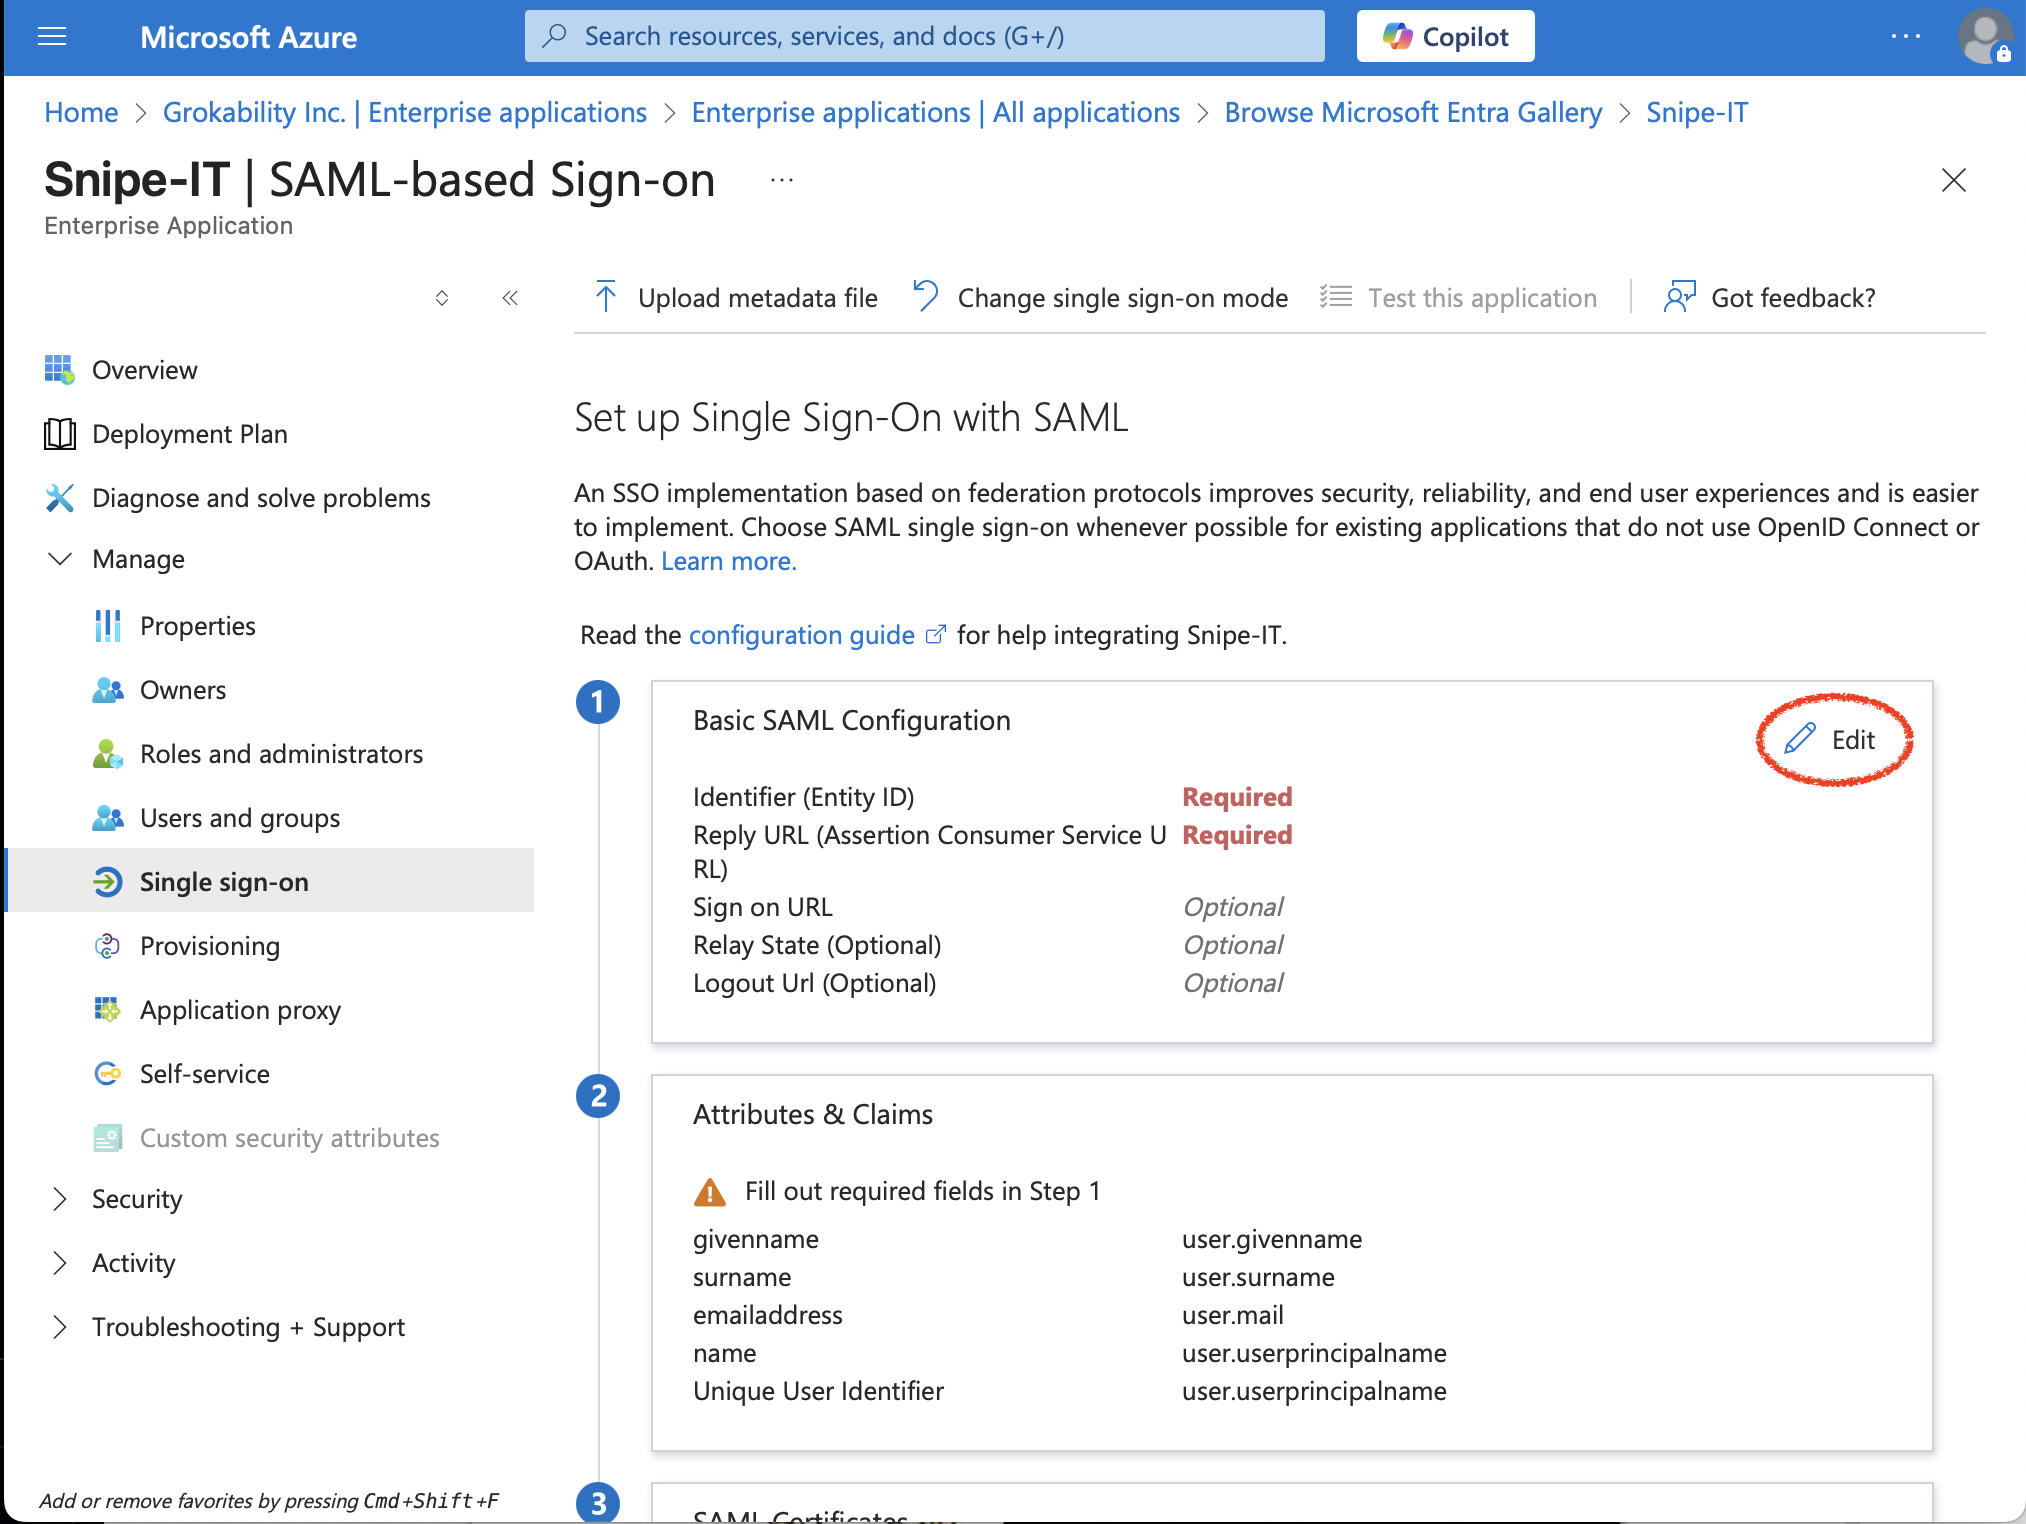
Using the following settings from your Snipe-IT instance:
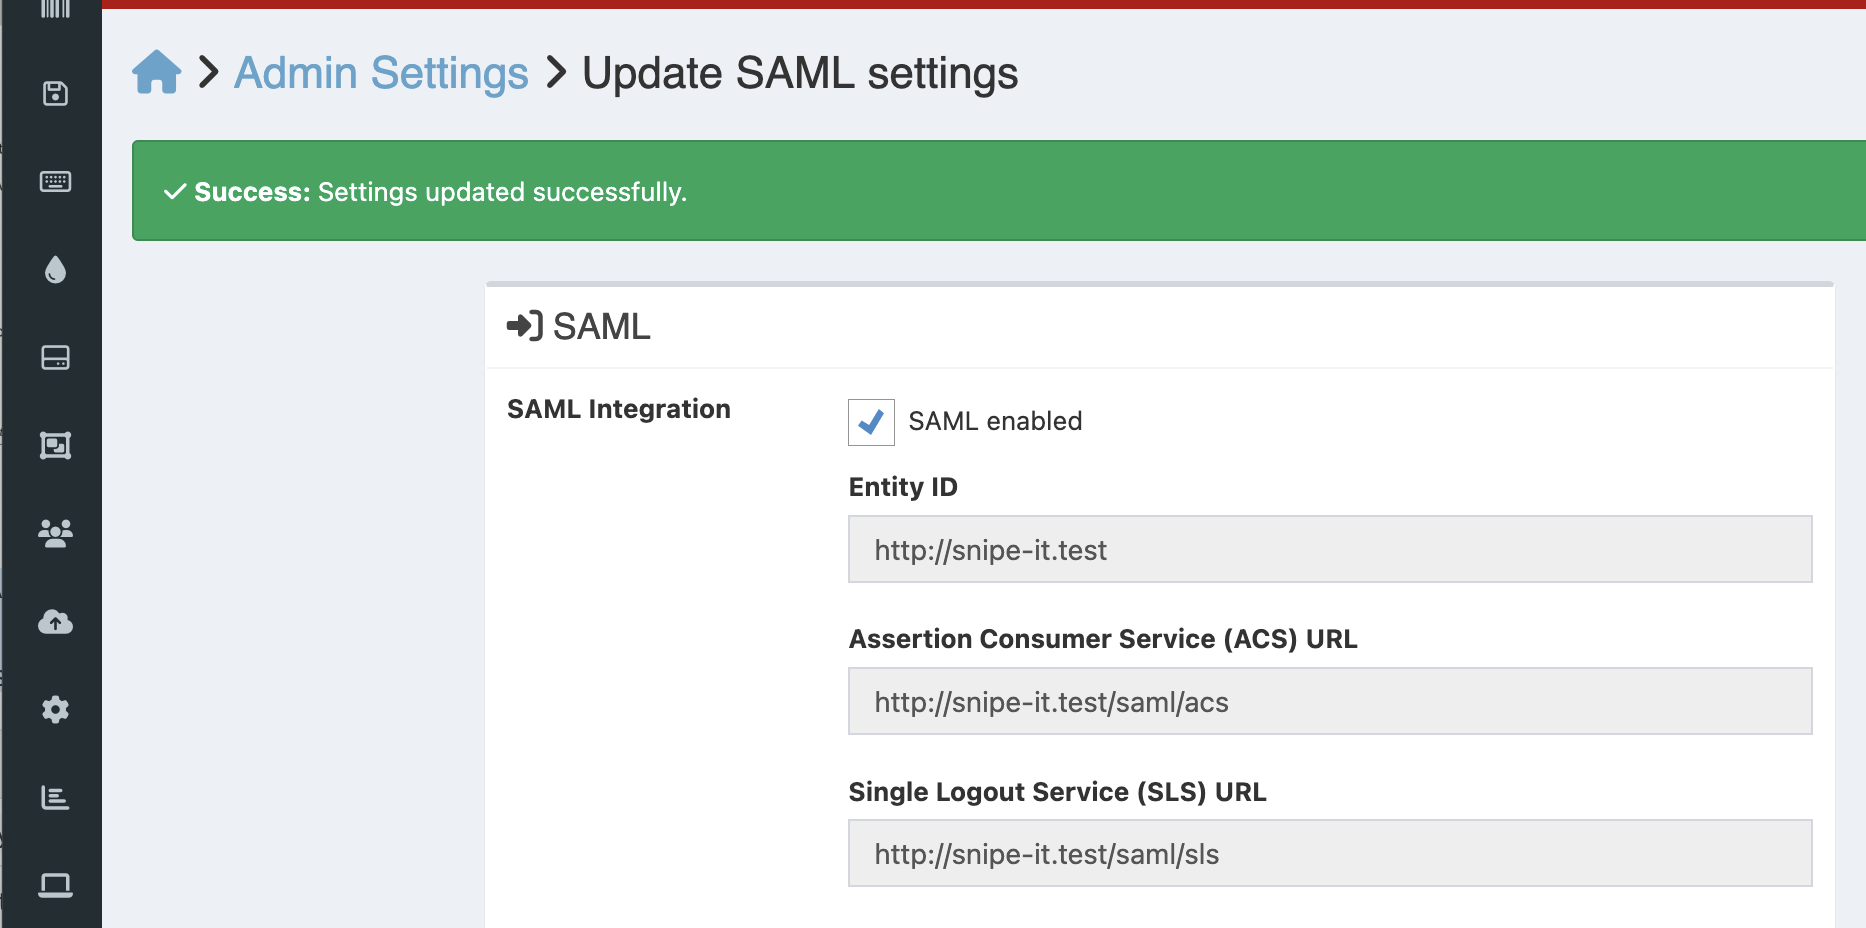
Put those values in for the "Identifier (Identity ID)," "Reply URL (Assertion Consumer Service URL)," and "Logout Url (Optional)" fields, into their respective fields in Entra ID.
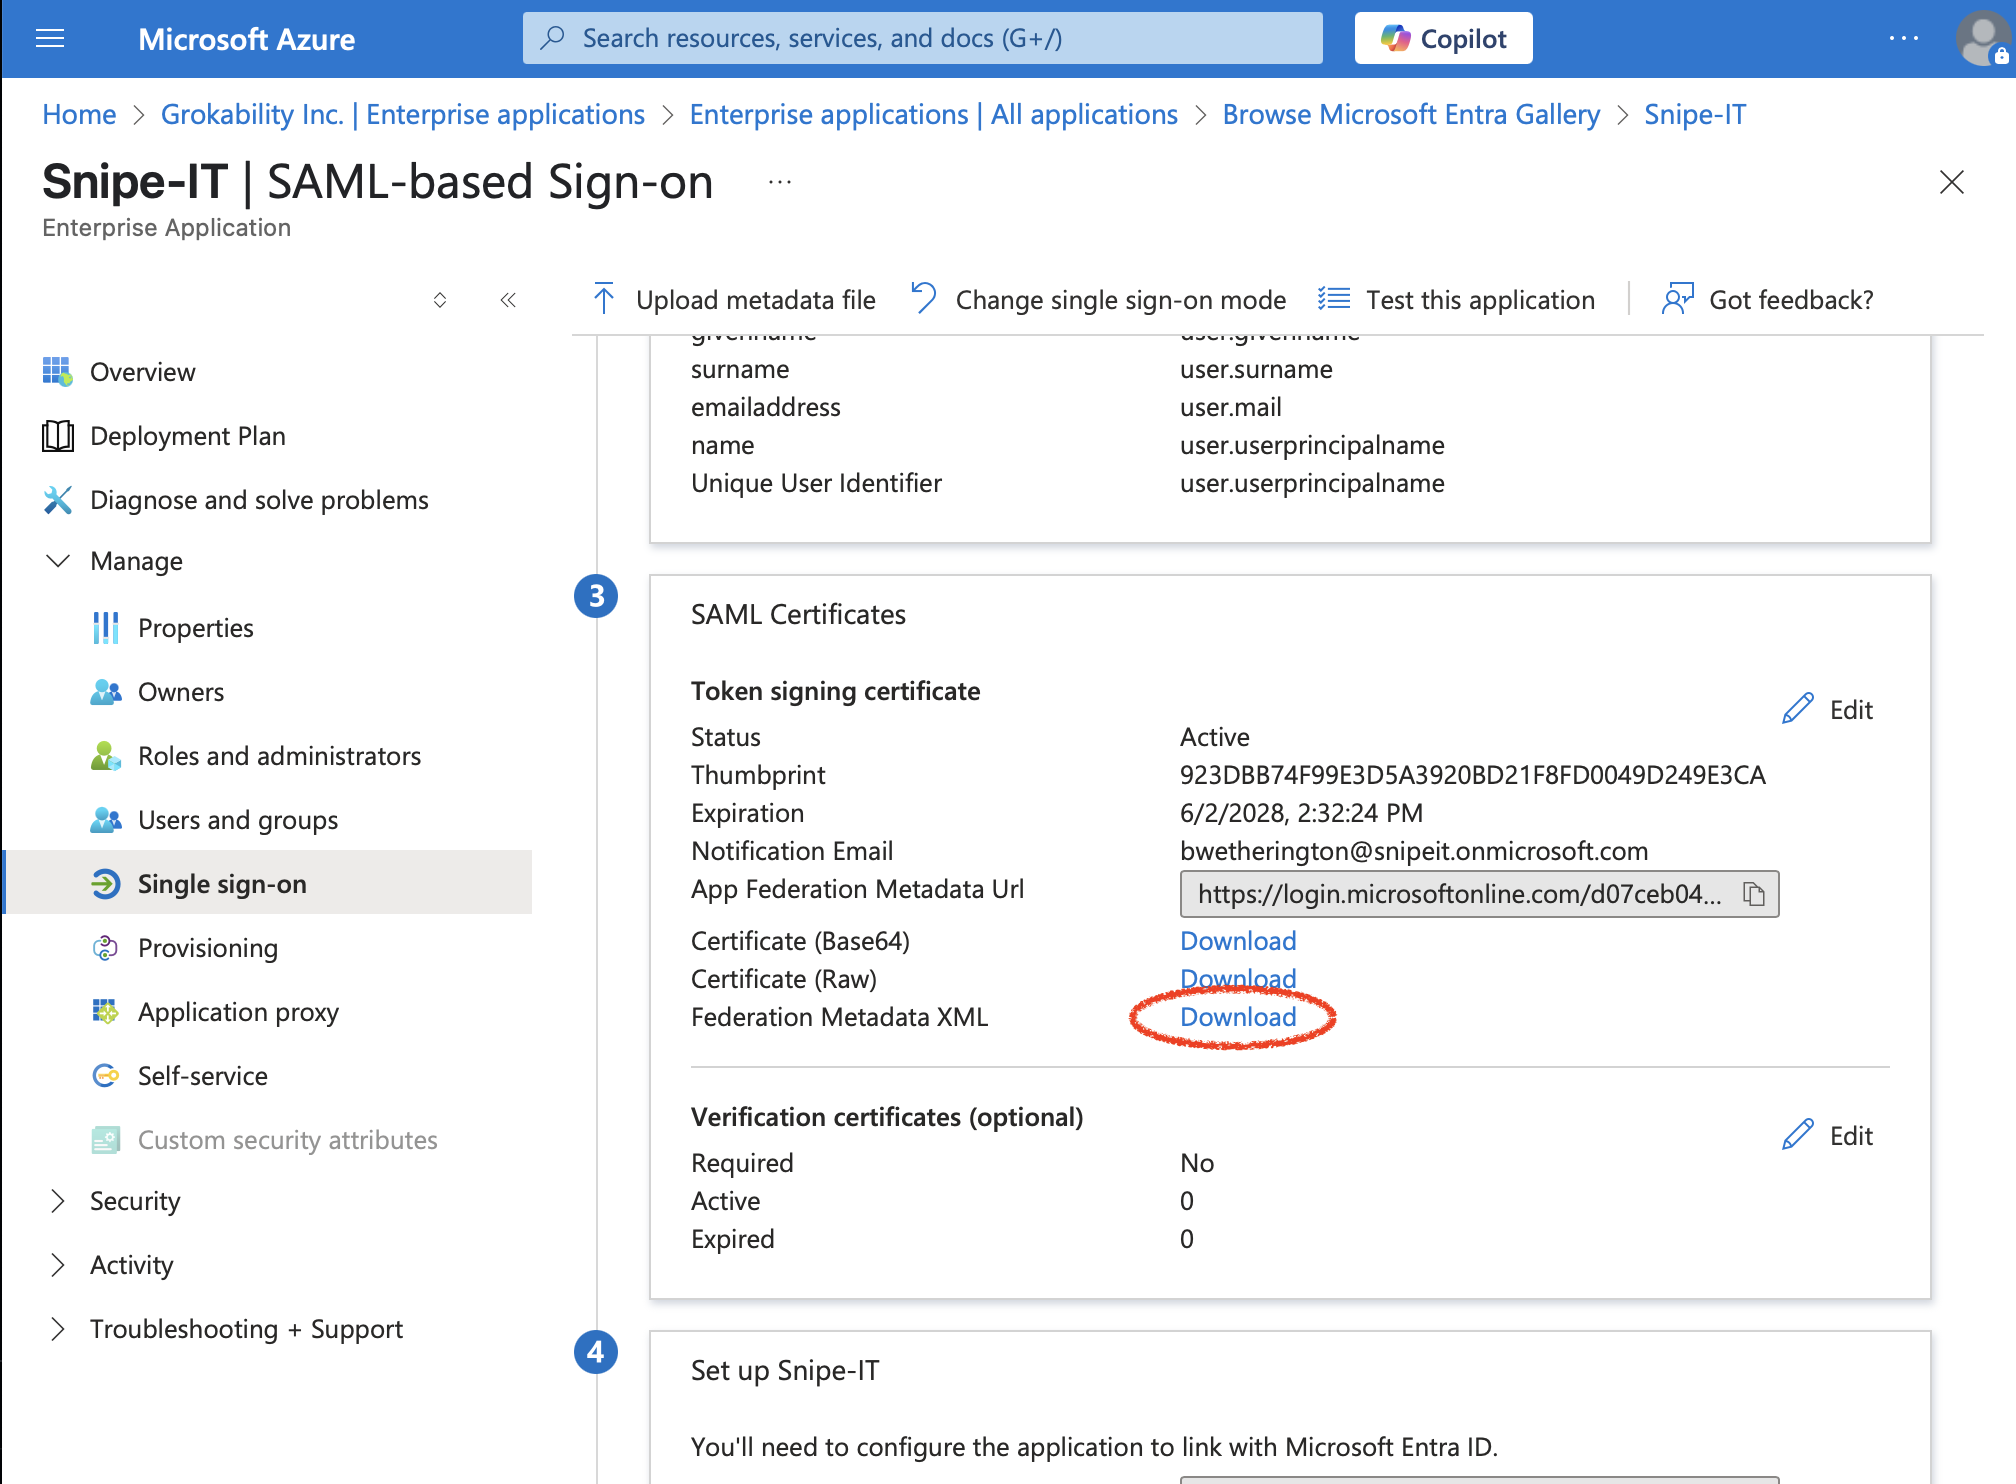
Download this metadata once you have filled in all of the above information, by clicking the "Federation Metadata XML" download link:
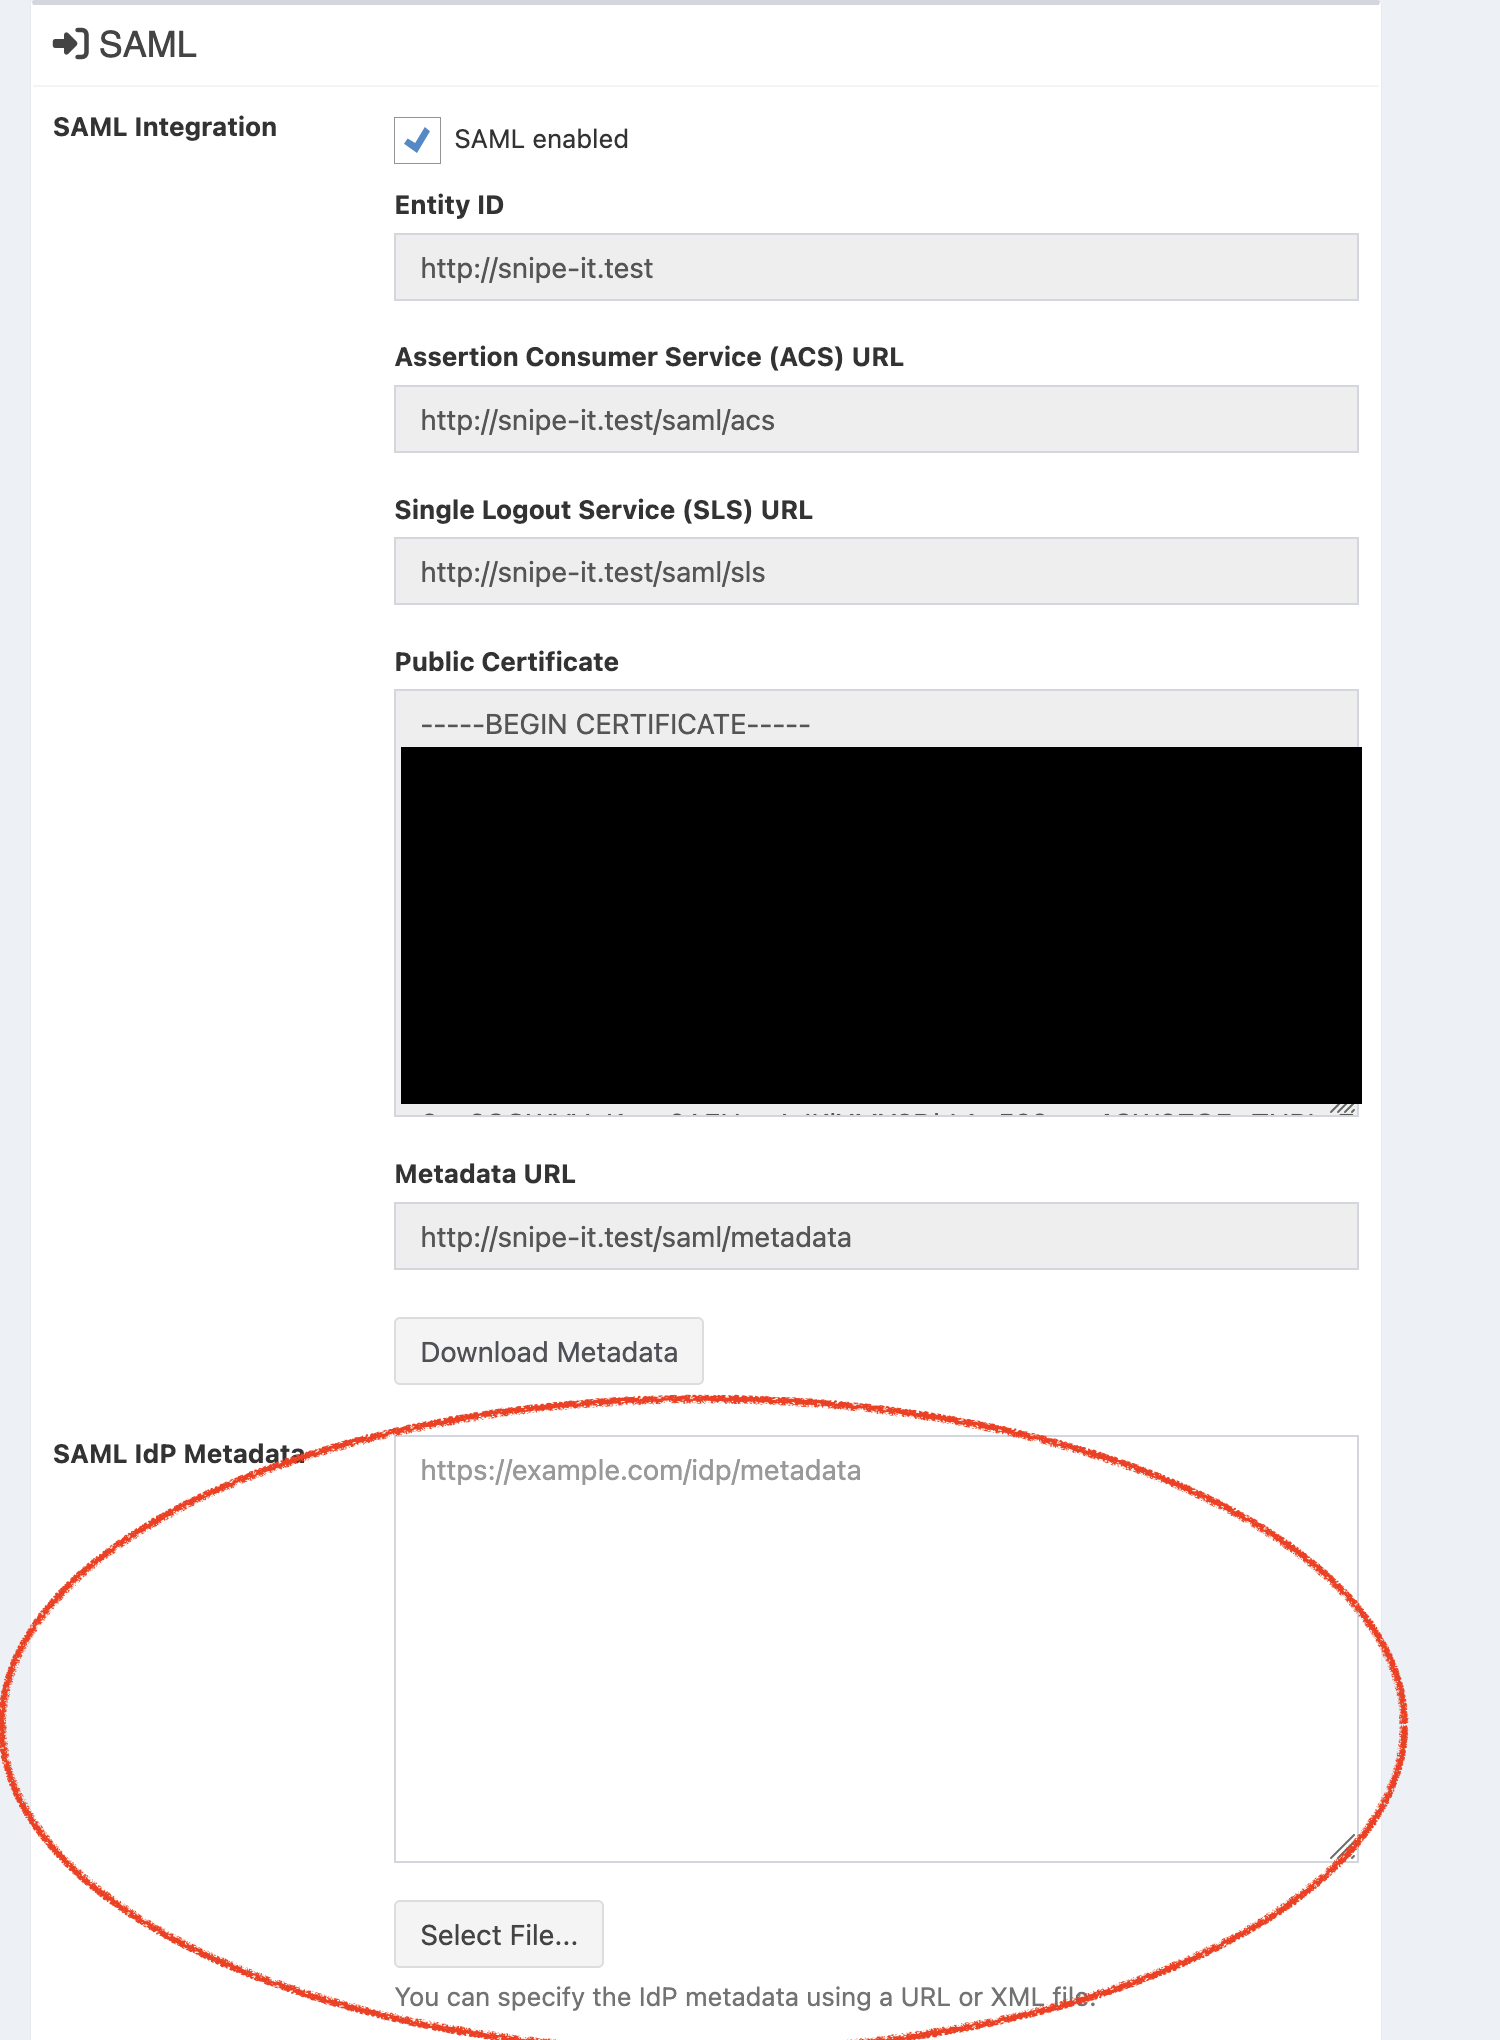
Now, avery important step - upload that file into Snipe-IT's SAML settings here:
Finally, add the users that are allowed to sign in via SAML to the Azure AD app under Users and Groups. If you miss this step, users will receive an error if they try and sign in via SAML.
Alternatively, if you would like to manage user assignment in Azure AD in a different way, refer to this documentation from Microsoft.
https://docs.microsoft.com/en-us/azure/active-directory/manage-apps/ways-users-get-assigned-to-applications
Azure SAML Single Logout Service (SLO / SLS)
To enable SAML SLO Service on Azure in versions of Snipe-IT at version 5.1.2-pre or later, make sure to add:
retrieveParametersFromServer=true
to the SAML Custom Settings text box near the bottom of the SAML Settings page.
Using username as NameId in Azure (as opposed to email-addresses like userprincipalname)
username as NameId in Azure (as opposed to email-addresses like userprincipalname)
Important Security NoteIf your Azure AD tenant allows external or guest users, and you allow all authenticated users to sign-in via SAML in Azure AD, it is recommended for security reasons that you do NOT implement this truncated username functionality. This is because any guest with a duplicate non-guest username that exists in your directory will be accepted by the application, and logged in. For example, this could allow
[email protected]to login as[email protected]as they share the samejsmithusername.Instead, you should configure Snipe IT usernames as full email addresses.
In "Attributes & Claims":

for Unique User Identifier (Name ID), you need to add a "Transformation." Pick Trim(), then pick 'Trailing'. For 'Value', type '@yourdomain.com' (for whatever domain you need to 'trim' off of the userprincipalname). If your Azure AD uses multiple domains, you can add multiple transformations to remove each of the domains.
This will ensure that Azure sends just the username-portion of the email address over to Snipe-IT, rather than the full address. If that username-portion matches the username field of a Snipe-IT user, the user will be logged in to Snipe-IT.
Additional Azure AD Troubleshooting
Azure AD x509 Error
If you see an error like:
Sorry, but we're having trouble signing you in.
AADSTS75011: Authentication method 'X509, MultiFactor' by which the user authenticated with the service doesn't match requested authentication method 'Password, ProtectedTransport'. Contact the Snipe-IT application owner.
or
Sorry, but we're having trouble signing you in.
AADSTS75011: Authentication method 'Multifactor, Fido' by which the user authenticated with the service doesn't match requested authentication method 'Password, ProtectedTransport'. Contact the Snipe-IT application owner.
For passwordless authentication, addsecurity.requestedAuthnContext=false to the "SAML Custom Settings" text box near the bottom of the SAML settings page. This should resolve the error.
Okta as SAML Identity Provider:
- In Snipe-IT, check the SAML Enabled checkbox and save.
- Create a new Application in Okta (select web and SAML 2.0).


- Add the Assertion Consumer Service (ACS) URL from snipe settings to the Single sign on URL field in Okta.
- Add the Entity ID from snipe to the Audience URI (SP Entity ID) field in Okta.
- Please be sure to select an appropriate Application username! It should match the usernames you use in Snipe-IT

- Click next.
- Select the Sign On tab and click on "View Setup Instructions"

- Copy the IDP Metada from the setup instructions and paste it to SAML IdP Metadata in Snipe-IT.

After testing the SAML login (do not forget to assign your application in Okta to accounts that should be able to login to Snipe) you can select the Make SAML the primary login to bypass classic login.
Google as SAML Identity Provider
Google only will allow you to authenticate via full email address, not "short usernames".
TLS on your Snipe-IT server is required - the SSO federation will fail otherwise. This is a Google requirement.
Follow Google's directions here: https://support.google.com/a/answer/6087519?hl=en&ref_topic=7559288
First, go to https://admin.google.com, and navigate to "Web and Mobile Apps"

Click Add App > Add custom SAML App


Give the app a useful name ("Snipe-IT" is probably a good choice), and an optional description and icon if you like.
When you get to the Google Identity Provider details, choose to 'download the IdP Metadata'.

Open that file in a text editor, and paste its contents into the Snipe-IT textarea that says "SAMl IdP Metadata". Turn on Make sure to check "SAML enabled" and click save - then you'll see values for the Entity-ID, ACS URL and the SLS URL.

Paste those values into the appropriate fields in the Google setup. When prompted for "Additional attributes" you don't need any.
Click Finish. Then, make sure to enable your Google SAML App for all users in your organization (or whichever subset you choose).


Click 'ON for everyone' and click 'SAVE'
Please note that it can take up to 24 hours for Google's setup process to complete!
Additional Google Troubleshooting
"Not a SAML app" error message
This usually means you have to wait for Google to finish setting up your App. Please be patient, as this can take up to 24 hours!
Shibboleth as SAML Identity Provider:
You may wish to use: urn:oid:1.3.6.1.4.1.5923.1.1.1.6 as your "Attribute Mapping - Username" if you are not identifying users by NameId.
You may also need to set security.requestedAuthnContext=false in the "SAML Custom Settings" field.
JumpCloud as a SAML Identity Provider:
Please see the official Jumpcloud + Snipe-IT integration guide on JumpCloud's website .
Authentik as a SAML Identity Provider
Please see the official Authentik + Snipe-IT integration guide on Authentik's website.
Iru as a SAML Identity Provider
There is an optional setting on the Iru side you need to enable for the SAML Assertions to be considered 'valid' by Snipe-IT. The setting "Session Management" needs to be Session Length Supported.
Updated 3 months ago