
SCIM
System for Cross-domain Identity Management, or SCIM, is an open standard protocol that streamlines the process of automating user identity management across different systems and applications. It provides an almost JIT ("just in time") provisioning system to add users to your Snipe-IT install.
To enable SCIM support to work with your SCIM provider, you first need to generate an API key for a Snipe-IT superuser. As a superuser:
- Go to the user menu near the upper-right, and choose "Manage API keys."
- Click "Create New Token."
- Copy the token and paste that in as a "Bearer Token" on your SCIM client's configuration pages. Sometimes this means you may have to add the word "Bearer" with a space and then your API token. The full authorization header should look something like:
Authorization: Bearer abcdefghijklmnopqrstuvwxyz1234567890The SCIM client will be able to create users from your directory, and Snipe-IT will try to map every field it can to the appropriate field within Snipe-IT.
The Snipe-IT SCIM URL's will look like https://your-snipe-it/scim/v2/<something> - in most SCIM providers, you need to just place that prefix of https://your-snipe-it/scim/v2/ and the SCIM protocol will handle the rest for you.
Entra ID/Azure AD SCIM v2 issues with 'active' flagIn Azure, you may need to append
?aadOptscim062020to your SCIM URL to ensure that Azure correctly uses SCIM v2 protocol to update your users' active flag.So your URL will look like:
https://your_servername/scim/v2?aadOptscim062020Microsoft documents their SCIM compliance flag here: https://learn.microsoft.com/en-us/entra/identity/app-provisioning/application-provisioning-config-problem-scim-compatibility#scim-20-compliance-issues-and-status
Appending that ?aadOptscim062020 query string just tells Entra to respond to us with a boolean flag for active users, versus a string, which they would normally send.
Changes with Snipe-IT v8.5Snipe-IT can now manage Groups, Mobile Phone numbers, displayName, and Managers.
Okta cannot handle the "Manager" attributeIf you have left Manager mapped in Okta, and your syncs are breaking, see https://snipe-it.readme.io/docs/scim#okta-notes
Mapping Location and Company
Since there are no native fields in SCIM that map cleanly to Snipe-IT's concepts of what a "Company" or a "Location" is, we've had to use an extension schema to carry those two values.
The namespace is:
urn:ietf:params:scim:schemas:extension:grokability:2.0:UserWithin that namespace, the two attributes we support are company and location. We are expecting those fields to be a text string that states the exact name of a company and location; and they will be created if they do not currently exist. If you are using Full Multiple Company Support (FMCS), be careful about mapping that Company field. And be especially careful if you're using Company-scoped Locations.
The 'company' mapping currently only supports one company, so don't use this if you're routinely using multiple companies for your users.
How to add a custom SCIM attribute to Entra ID
Go to Provisoining, Attribute Mapping, Provision Microsoft Entra ID Users, then click the checkbox for "Show Advanced Options." Then go to "Edit attribute list for customappsso." In the blank line at the bottom, add the schema, a colon, and the attribute - like this: urn:ietf:params:scim:schemas:extension:grokability:2.0:User:location . Keep that as a 'String' type, and save.
Now, when you go to your normal Mappings page for your Provisioning integration, you'll see the new SCIM field available as one of your options. Pick whichever field you've chosen in Entra to map to Snipe-IT's "Location," and save your changes.
Setting up SCIM Provisioning with Microsoft Entra ID
To configure automatic user provisioning from Microsoft Entra ID to Snipe-IT via SCIM, follow these steps:
-
In the Azure Portal, go to Enterprise Applications and create a new application or select an existing one.
-
Navigate to the Provisioning blade and set the Provisioning Mode to
Automatic. -
Under Admin Credentials, fill in the required fields:
- Tenant URL:
Use your Snipe-IT SCIM endpoint, for example:
https://your_servername/scim/v2?aadOptscim062020 - Secret Token:
Paste the API token generated in Snipe-IT.
- Tenant URL:
-
Click Test Connection to verify connectivity.
-
Once the test is successful, click Save.
-
Go to Users and Groups, and assign users or groups that should be provisioned into Snipe-IT.
Azure will now begin provisioning users to Snipe-IT automatically, based on the assignments you’ve made.
Unsupported HTTP Verbs
DELETE is not supported by the underlying library yet
Azure SCIM and User DatabasesIf you restore from a backup, or regenerate your Users table somehow, you may need to delete your provisioning profile and re-create it. This is because Azure will "remember" your old user ID's and will refuse to "learn" the new ones. The only way to make it "forget" is to delete your provisioning profile and re-create it.
All supported mappings into Snipe-IT
| SCIM Name | Snipe-IT Users field | Data Type | Required? |
|---|---|---|---|
| userName | username | string | YES |
| givenName | First Name | string | YES |
| familyName | Last Name | string | |
| displayName | display_name | string | |
| emails.work.value | string | ||
| active | Activated | boolean | |
| phoneNumbers.work.value | Phone | string | |
| phoneNumbers.mobile.value | mobile | string | |
| addresses.work.streetAddress | Address | string | |
| addresses.work.locality | City | string | |
| addresses.work.region | State | string | |
| addresses.work.postalCode | ZIP | string | |
| addresses.work.country | Country | string | |
| title | jobtitle | string | |
| preferredLanguage | locale | string | |
| (Enterprise Namespace):employeeNumber | employee_num | string | |
| (Enterprise Namespace):manager | manager_id | integer | |
| (Enterprise Namespace):department | (Lookup by name to set department_id) - the department name MUST exist in Snipe-IT ahead of time for this field to sync correctly. | string | |
| (Grokability Namespace):location | location_id - locations will be created if they do not match the exact name | string | |
| (Grokability Namespace):company | company_id - companies will be created if they do not match the exact name | string |
Environment Variables
In your .env file, you can specify two new environment values that modify how Snipe-IT's SCIM server works.
| Name | Description | Default value |
|---|---|---|
SCIM_TRACE | When set to true, all SCIM requests and responses will be logged to a scim.log file in the storage/logs directory | false |
SCIM_STANDARDS_COMPLIANCE | When set to true, Snipe-IT tries to more closely follow the SCIM specifications. Definitely needed for OneLogin. When set to false, Snipe-IT maintains its original behavior. (This seems to rarely need to be changed) | true |
SCIM support did not previously support changing email addresses via Azure and some other SCIM clients. Since v6.2, that has been fixed, but if you were depending on the previous behavior, you may get unexpected results.
Okta Notes
"User Account is Inactive"
If you get an error message of "User Account is Inactive" when trying to synchronize the 'login enabled' checkbox, make sure to enable "Deactivate Users" in the "Provisioning Settings" within the App settings on Okta. Read more in their support document here: https://support.okta.com/help/s/article/Smartsheet-provisioning-error-Automatic-provisioning-of-user-to-app-Smartsheet-failed-User-account-is-inactive?language=en_US
"Error while trying to push profile update"
If you have tried to map anything in Okta, and it has broken your SCIM syncs, and "un-mapping" those problem attributes doesn't seem to help, then try this:
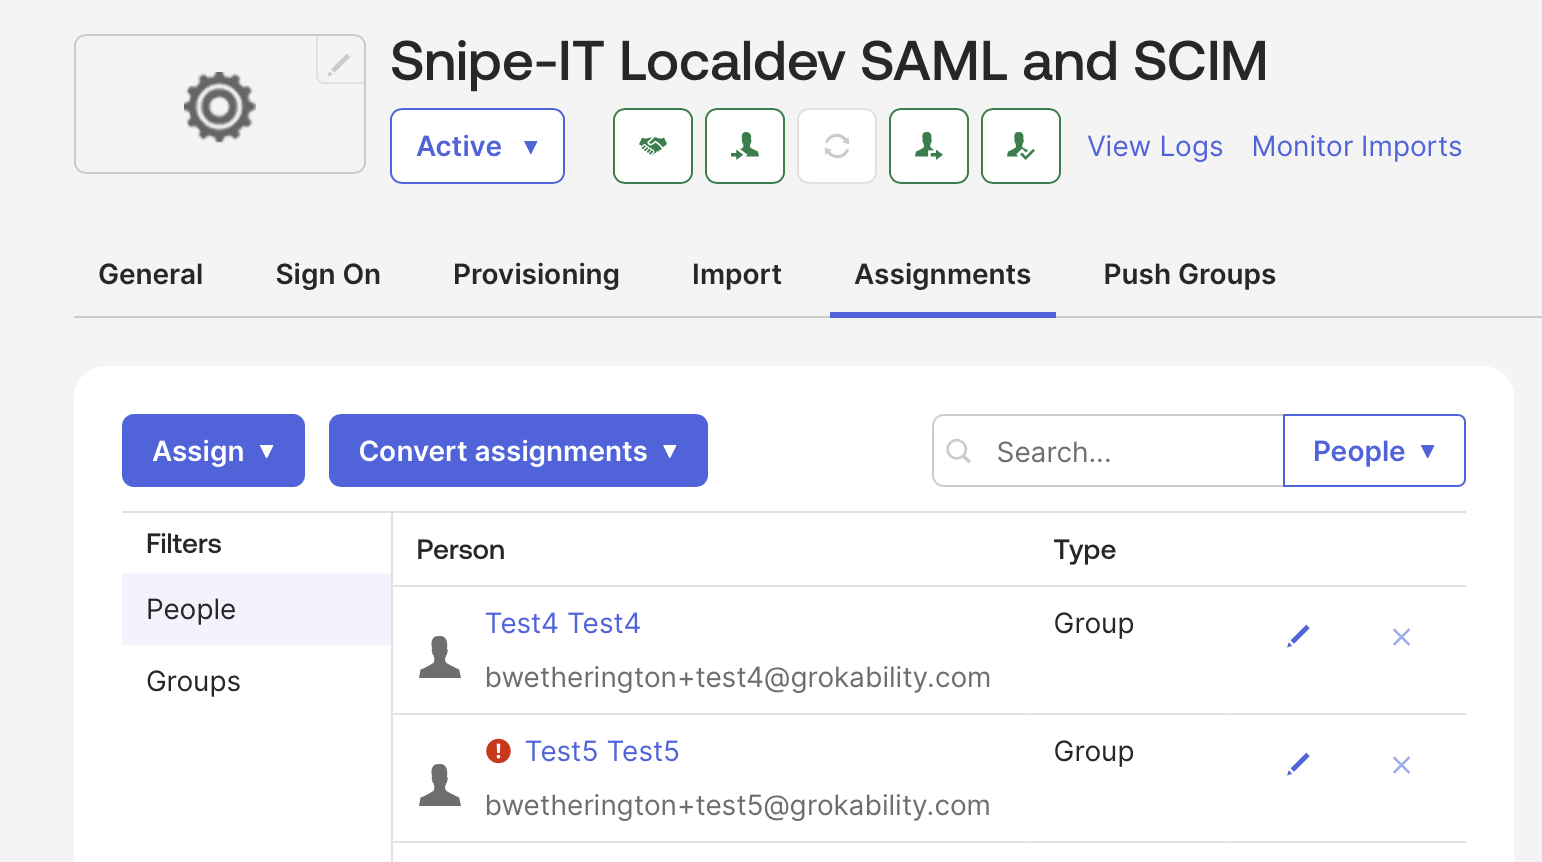
Go to your Snipe-IT Application, then click on Assignments, and you should see a screen like this:
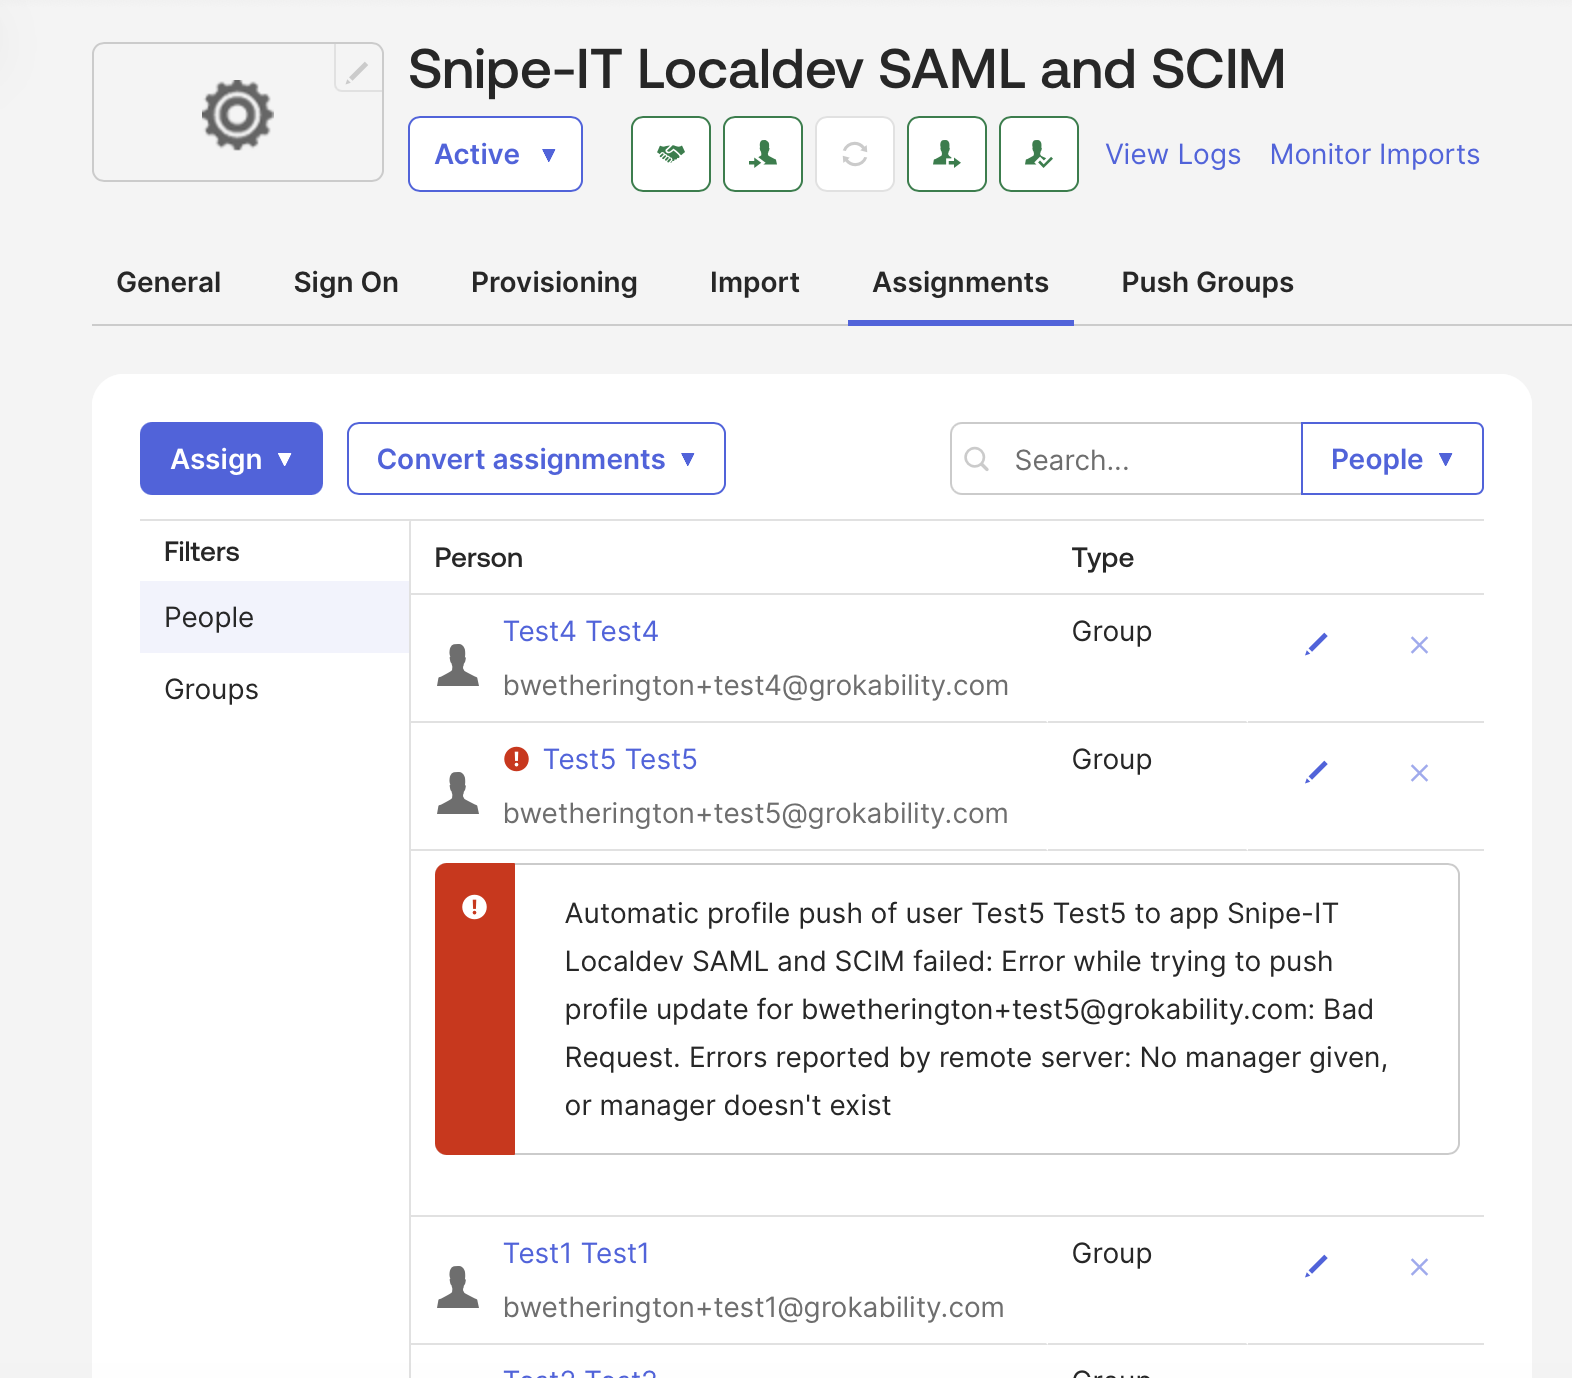
If you click the little exclamation mark, you should see this:
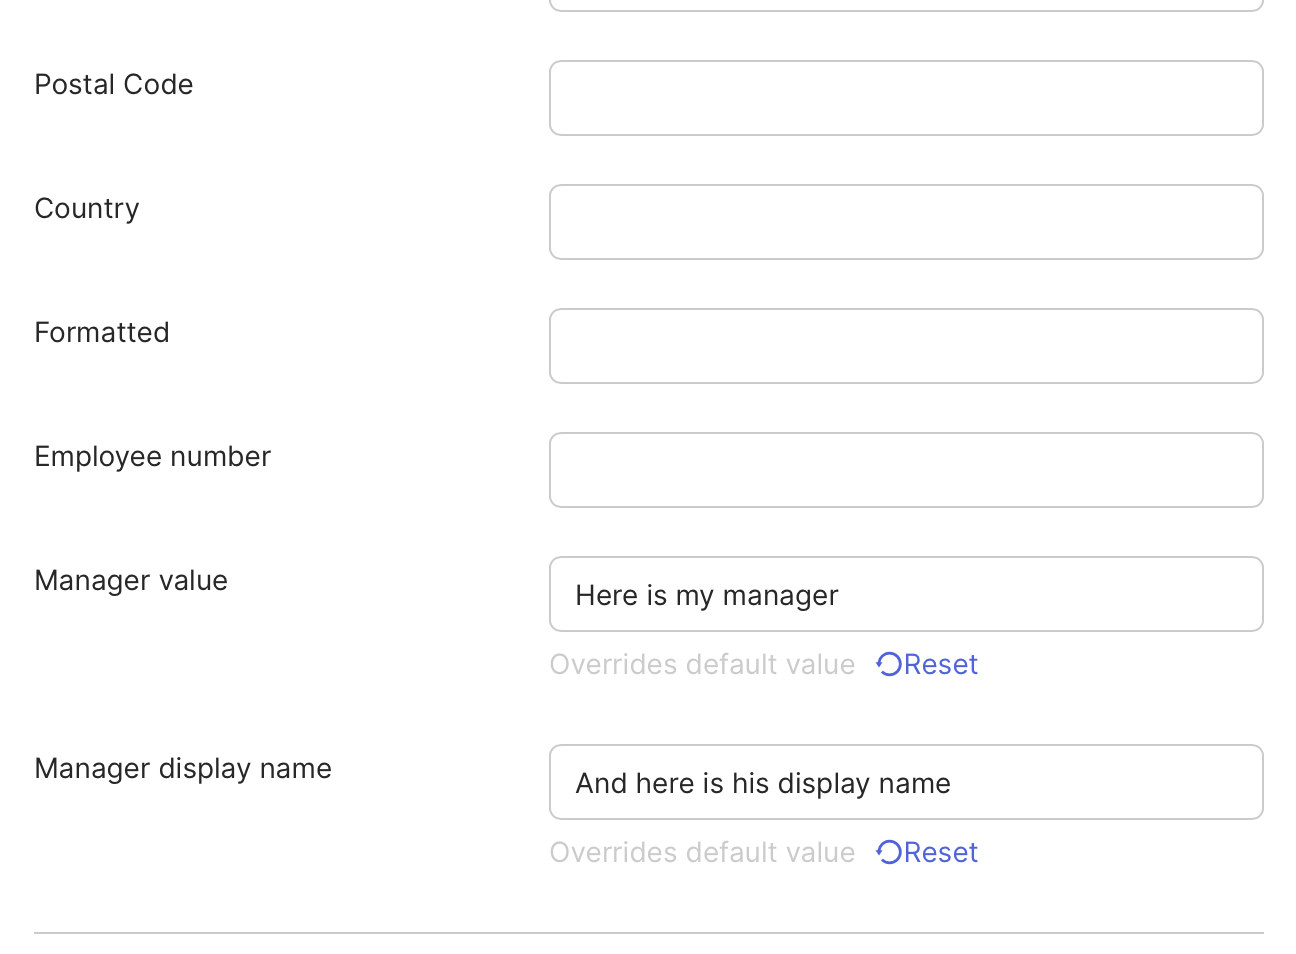
Simply click on the "Pencil" icon, which will let you edit this assignment - it will not affect the 'real' user record. You should get a screen that lets you edit the profile. Scroll down to the problem attribute and either "reset" it or blank it out, then hit save.
Here's an example for Manager, which Okta does not support, so you would want to blank out those two "Manager" values:
You should only ever have to do this once - after that, the un-mapped field will no longer attempt to be sent.
Updated 28 days ago